
Shift Left with Scripts
Being an impatient hungovercoder due to the constant headaches the night before often brings upon me, I need to make sure I find out as early as possible whether my deployment pipeline is working. For years I have committed my code and waited for some proprietary tooling embedded within Azure devops or github actions to tell me the answer… I have changed my ways and have now brought the scripts for deployment into my codebase that I can simulate easily locally in my cloud developer environment AND then use the exact same scripts for my deployment pipeline! Read on fellow hungovercoder and find out how to shift left with scripts…
- Shifting Left with Scripts
- Goal: Deploying a Container App in Azure
- Prerequisites
- Love Environment Variables
- Smoke Test Driven Development
- Local Application Development
- Local Infrastructure Development
- Configure Cloud Developer Startup
- Environment Deployment
- To be Continued
Shifting Left with Scripts
I have seen the light and started using scripts for my deployment processes. Along with dockerfiles all of the complexity of deployment can be abstracted away which keeps your deployment pipelines really dumb. Having the detail in the scripts too means you control the abstraction and have a deeper understanding of how things work. If you rely on third party tools, whilst they may seem quicker at first, they are not transferable nor can you recreate them locally. Not being able to do this locally can lead to a painful development process whereby you do not know the impact of your changes on a deployment pipeline until you have committed and waited an age to get that feedback… The details below hopefully show you how you can bring all of this right into your development process and shift that pipeline all the way to the left using scripts!
Goal: Deploying a Container App in Azure
The code the blog below is based on can be found in this github repo. Essentially this repo:
- Creates a dotnet API.
- It creates a container image and container with basic testing.
- It pushes this image to docker hub.
- Terraform is then used to provision a container app referencing this image.
Prerequisites
You’re going to need the following platforms in order to follow along with the demonstrations in this blog:
For development on your local machine your going to need the following tools installed:
These VS code extensions are also useful for the development methods used.
- Terraform Extension
- Azure Tools Extension
- C# Dev Kit Extension
- Github Actions Extension
- Docker Extension
OR… you can just sign up and use Gitpod and utilise the configuration below I used to create this which installs all of the above for you!!!
Spoiler alert the demos below are going to be using Gitpod as a cloud developer environment because its so much easier…
Love Environment Variables
I am a big fan of environment variables. I think their power is criminally overlooked by developers. Whenever I am setting up my development capabilities I want my local development environment to have identical capabilities and outcomes to my actual environment development and production environments. The only thing I want to potentially change are my environment variables. In the following demonstrations the following environment variables will be configured in my gitpod and github actions environments, with my local domain.env file dictating static environment variables held in the codebase and reused throughout.
Dynamic Environment Variables
| Variable Name | Purpose |
|---|---|
| ARM_CLIENT_ID | Used along with client secret and Tenant ID to authenticate with an application registration against Azure. |
| ARM_CLIENT_SECRET | Used along with client ID and Tenant ID to authenticate with an application registration against Azure. |
| ARM_TENANT_ID | Used along with client ID and client secret to authenticate with an application registration against Azure. |
| ARM_SUBSCRIPTION_ID | Used to provide subscription that the resource deployment will take place in. |
| ARM_REGION | Dictates the region the resources will be deployed into e.g. north europe |
| DOCKER_USERNAME | Docker username to login and push or pull images. |
| DOCKER_PASSWORD | Docker password to login and push or pull images. |
| ENVIRONMENT | Whether the action is taking place in development, uat or production environment. |
| ORGANISATION | The name of the organisation deploying e.g. hungovercoders. |
| UNIQUE_NAMESPACE | A unique namespace to postfix Azure assets with e.g. hngc. |
Static Environment Variables
| Variable Name | Purpose |
|---|---|
| TEAM | The name of the team that owns the asset used in tagging resources for example. |
| DOMAIN | The business domain that incorporates the asset used in tagging resources for example. |
| APP | The name of the application. |
| PORT | The port number tha application will expose itself on through docker. Makes it easy to reuse where needed. |
The following is held in a domain.env file like the following:
TEAM=hungovercoders
DOMAIN=dotnet
APP=dotnet-api
PORT=5050
I have started a number of cheatsheets for hungovercoders and one of them is for my configurations which is useful reference for myself and may give you some ideas too.
Smoke Test Driven Development
Lets get this straight I am no tester. This is something I definitely need in my arsenal and I hope to reach some modicum of knowledge soon… However I do know how to request an endpoint using curl and so I thought to myself… Lets do that. I will start development with a simple goal of requiring a successful 200 response from a health endpoint and in later sessions I will improve my tests - but at least I have something telling me if my API endpoint is there. I created a “tests” directory at the root of my git repository and added two files.
test/smoke_test.sh
test/test.sh
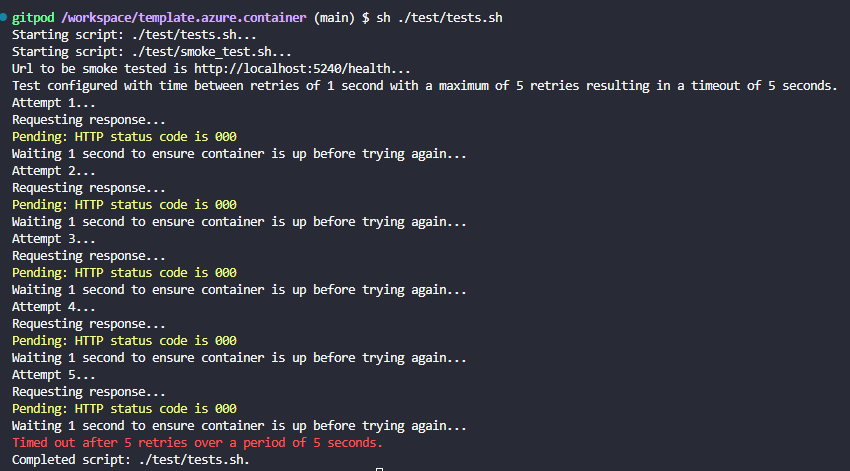
The first test file which calls the URL I pass it as a parameter is a simple smoke test that confirms I get a 200 from the URL designated. I defaulted this URL to a localhost value with the port number I have in my domain environment variable file that I eventually expect to be the one opened for my application along with the endpoint “health”. I added some retries into the behaviour as I noticed later my application can sometimes take a second or so to startup when I run this as part of a container build and run process.
echo "Starting script: $0..."

set -a
. ./domain.env
set +a

URL=${1:-http://localhost:$PORT/health}
echo "Url to be smoke tested is $URL..."

retries=5
wait=1
timeout=$(($wait*5))

echo "Test configured with time between retries of $wait second with a maximum of $retries retries resulting in a timeout of $timeout seconds."

counter=1
while [ $counter -le $retries ]; do
    echo "Attempt $counter..."
    echo "Requesting response..."
    response=$(curl -s -o /dev/null -w "%{http_code}" $URL)
    if [ "$response" -eq 200 ]; then
        echo "\e[32mSuccess: HTTP status code is 200\e[0m"
        exit 0
    elif [ "$response" -eq 000 ]; then
        echo "\e[33mPending: HTTP status code is 000\e[0m"
    else
        echo -e "\e[31mError: HTTP status code is $response\e[0m"
        exit 1
    fi

    sleep $wait
    echo "Waiting $wait second to ensure container is up before trying again..."
    counter=$(expr $counter + 1)
    done
echo "\e[31mTimed out after $retries retries over a period of $timeout seconds.\e[0m"
exit 1
I introduced a couple of components I wanted of my script files here which is to have good print messages, appropriate colouring for success and failure, and wrap my scripts with:
echo "Starting script: $0..."
...
echo "Completed script: $0."
This simply prints out the script file that has started and completed which makes it really easy to debug.
I then added the parent test.sh script file simply to have one thing to reference from my local development environment and my eventual pipelines. This means even if I mess around with test files my integration layer to my test scripts will be consistent. The file simply looks like the following with scope for more tests when needed.
set -e  # Exit immediately if a command exits with a non-zero status.

echo "Starting script: $0..."

sh ./test/smoke_test.sh

echo "Completed script: $0."
If I run this now I get the expected failure as I have not built nor run an API to satisfy this smoke test yet. Hence smoke test driven development… Hey we got to start somewhere!
Local Application Development
Quick Start
I quickly need an API to pass my test! As I am using dotnet I can quickly use the following command to get myself a dotnet API working, imaginatively called “api”.
dotnet new webapi --name api
This generates all the simple API code I need which is the weather forecast example Microsoft provides. If you navigate to the Program.cs file you will see something like the following:
...
var summaries = new[]
{
    "Freezing", "Bracing", "Chilly", "Cool", "Mild", "Warm", "Balmy", "Hot", "Sweltering", "Scorching"
};

app.MapGet("/weatherforecast", () =>
{
    var forecast =  Enumerable.Range(1, 5).Select(index =>
        new WeatherForecast
        (
            DateOnly.FromDateTime(DateTime.Now.AddDays(index)),
            Random.Shared.Next(-20, 55),
            summaries[Random.Shared.Next(summaries.Length)]
        ))
        .ToArray();
    return forecast;
})
.WithName("GetWeatherForecast")
.WithOpenApi();

app.Run();
...
You can build this applicaton to make sure its all working:
cd api
dotnet build
dotnet run
Right that’s the basics done, but we want this running in a docker container so we can work with it locally in an environment that exactly reflects that in the destined Azure container app!
Containerize the API
We can add the following basic Docker file to our application directory.
FROM mcr.microsoft.com/dotnet/aspnet:8.0 AS base
WORKDIR /app
EXPOSE 5050

LABEL       author="datagriff"

ENV ASPNETCORE_URLS=http://+:5050

USER app
FROM --platform=$BUILDPLATFORM mcr.microsoft.com/dotnet/sdk:8.0 AS build
ARG configuration=Release
WORKDIR /src
COPY ["api/api.csproj", "api/"]
RUN dotnet restore "api/api.csproj"
COPY . .
WORKDIR "/src/api"
RUN dotnet build "api.csproj" -c $configuration -o /app/build

FROM build AS publish
ARG configuration=Release
RUN dotnet publish "api.csproj" -c $configuration -o /app/publish /p:UseAppHost=false

FROM base AS final
WORKDIR /app
COPY --from=publish /app/publish .
ENTRYPOINT ["dotnet", "api.dll"]
The port number must match up with your environment file in order for everything to work accordingly. Its really important to note that your Dockerfile is your applications CI build! You can see contained within this very simple Dockerfile the RUN dotnet build task. Therefore we do not need to add any other complexity to our CI process as the Dockerfile encapsulates all this logic. This is step 1 in consistency between your local development and the eventual deployment pipeline, the Dockerfile consistency ensures the pipeline is the same for the application.
Next you can do a simple docker build, run, test and push to your container registry as you wish… I have written the docker_build.sh script below which allows me to do all this very easily from my local machine, utilising environment variables where necessary.
set -e  # Exit immediately if a command exits with a non-zero status.

RUN=${1:-False}
PUSH=${2:-False}

echo "Starting script: $0..."

set -a
. ./domain.env
set +a

if [ $RUN = True ]; then
    echo "You have chosen to run the image as a container once built."
fi
if [ $RUN = False ]; then
    echo "You have chosen not to run the image as a container once built."
fi

if [ $PUSH = True ]; then
    echo "You have chosen to push the image once built, run and tested."
fi
if [ $PUSH = False ]; then
    echo "You have chosen not to push the image once built, run and tested."
fi

echo "Organisation is $ORGANISATION."
echo "App name is $APP."
CONTAINERNAME=$APP
echo "Container name is $CONTAINERNAME."
BRANCH=$(git rev-parse --abbrev-ref HEAD)
echo "Branch is $BRANCH."
if [ -n "$(git status --porcelain)" ]; then
    echo "Uncommitted changes so image tag is..."
    IMAGE_TAG="$BRANCH-development"
else
    echo "All changes committed so image tag is..."
    COMMIT_ID=$(git log -1 --format="%h")
    IMAGE_TAG="$BRANCH-$COMMIT_ID"
fi
echo "$IMAGE_TAG."
IMAGENAME=$ORGANISATION/$APP:$IMAGE_TAG
echo "Image name is $IMAGENAME."

echo "Changing to application directory to interact with docker file..."
cd api
echo "Changed to application directory to interact with docker file."
echo "Building $IMAGENAME..."
docker build -t $IMAGENAME .
echo "Built $IMAGENAME."
echo "Changing to back to root directory..."
cd ..
echo "Changed to back to root directory."


if [ "$(docker inspect -f '' "$CONTAINERNAME" 2>/dev/null)" = "true" ]; then
    echo "Stopping container: $CONTAINERNAME"
    docker stop $CONTAINERNAME
    echo "Container stopped successfully."
else
    echo "Container $CONTAINERNAME is not currently running."
fi

if [ "$RUN" = "True" ] || [ "$PUSH" = "True" ]; then
    sh ./tools_app/docker_containers_clear.sh
    echo "Run container $CONTAINERNAME from image $IMAGENAME..."
    docker run -d -p $PORT:$PORT --name $CONTAINERNAME $IMAGENAME
    echo "Running container $CONTAINERNAME from image $IMAGENAME."
    sh ./test/tests.sh
fi

sh ./tools_app/docker_list.sh

if [ $PUSH = True ]; then
    echo "Logging in to Docker..."
    docker login --username $DOCKER_USERNAME --password $DOCKER_PASSWORD ##--password-stdin - how to use?
    echo "Logged in to Docker."
    echo "Pushing image $IMAGENAME..."
    docker push $IMAGENAME
    echo "Pushed image $IMAGENAME."
fi

echo "Completed script: $0."
- The script takes in two booleans of whether you want to RUN or PUSH as well as the container build.
- The script will only push if the container has run locally successfully including the tests on the running container.
- The script uses some basic semantic versioning for my image tags by using the branch name and commit id when code is committed. If the repo has uncommitted changes then I use the branch name plus “-development” just to separate it from the image already in place for that branch to prevent overrides. I need to refine this further but ultimately this stopped me from accidentally pushing to latest whilst my production API was still referencing it! Its a bit noisey with regards to number of images and tags, but it will do me for now.
- The script leverages all of our lovely environment variables.
- The script also leverages 2 other scripts that I find useful for local development to speed things along…
docker_containers_clear.sh
echo "Starting script: $0..."
echo "Removing all stopped containers..."
docker container prune --force
echo "All stopped containers removed."
echo "Completed script: $0."
docker_list.sh
echo "Starting script: $0..."
echo "Listing all images..."
docker images
echo "Listed all images."
echo ""
echo "Listing all containers..."
docker ps --all
echo "Listed all containers."
echo "Completed script: $0."
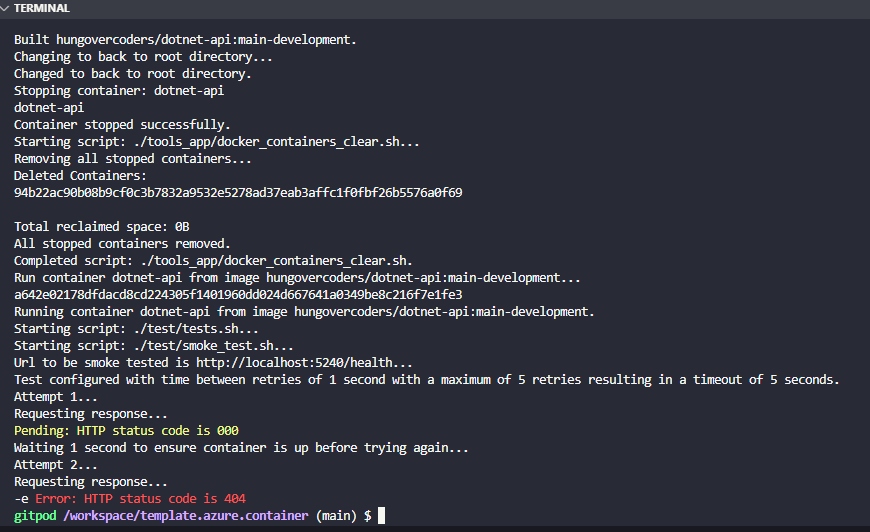
Right if we run the docker build script to run and aim to push our docker image by setting both params to True:
sh ./tools_app/docker_build.sh True True
We still get the failing test, which luckily also stops us pushing a bad image up to Docker Hub that will be of no use to anyone…
Of course we need to add the health endpoint to the API. If we add the following line of code to our Program.cs file we will now get the health endpoint:
app.MapGet("/health", () => "Healthy");
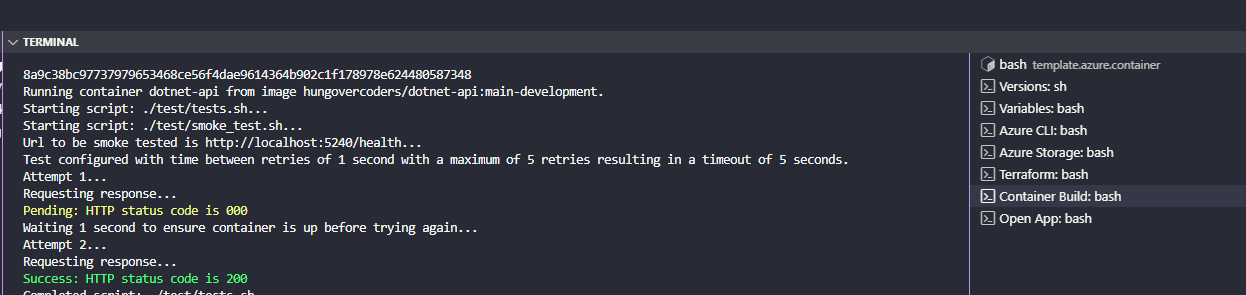
So if we now run:
sh ./tools_app/docker_build.sh True True
We get a passing test:
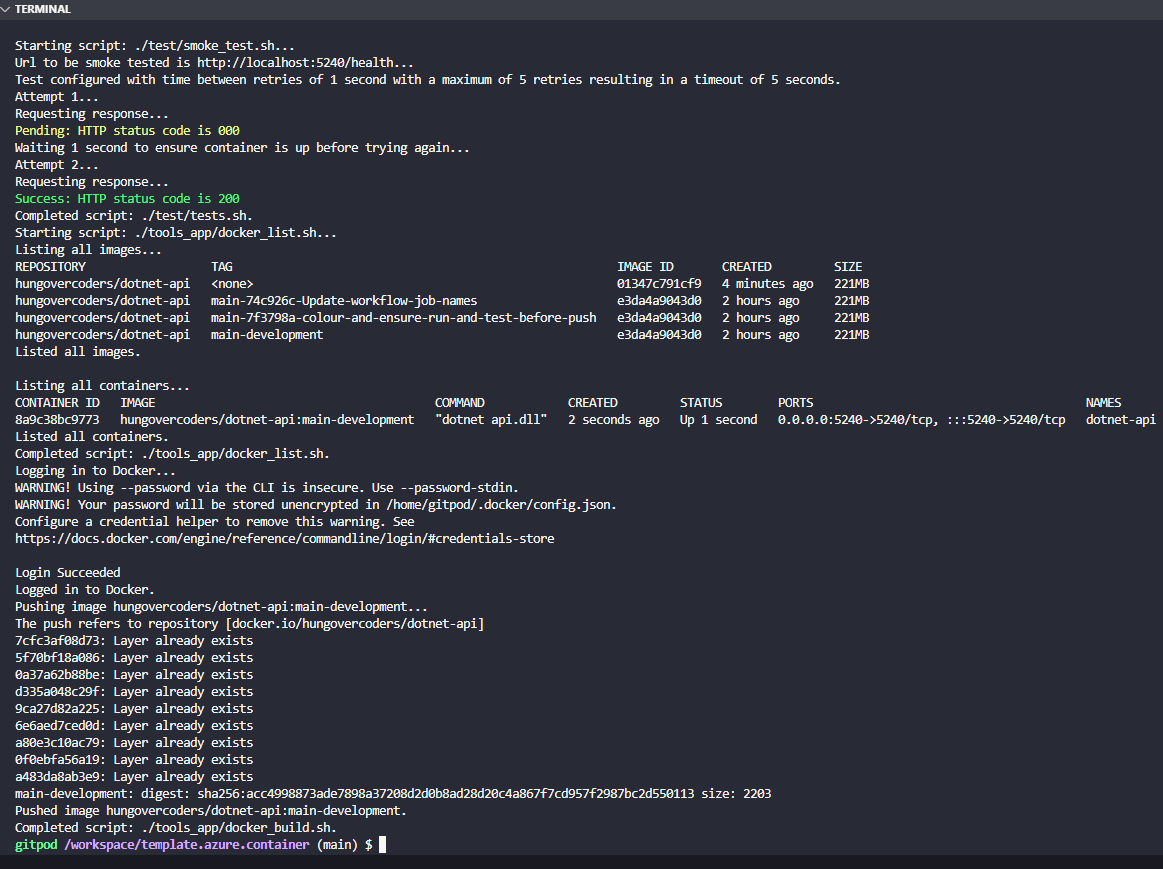
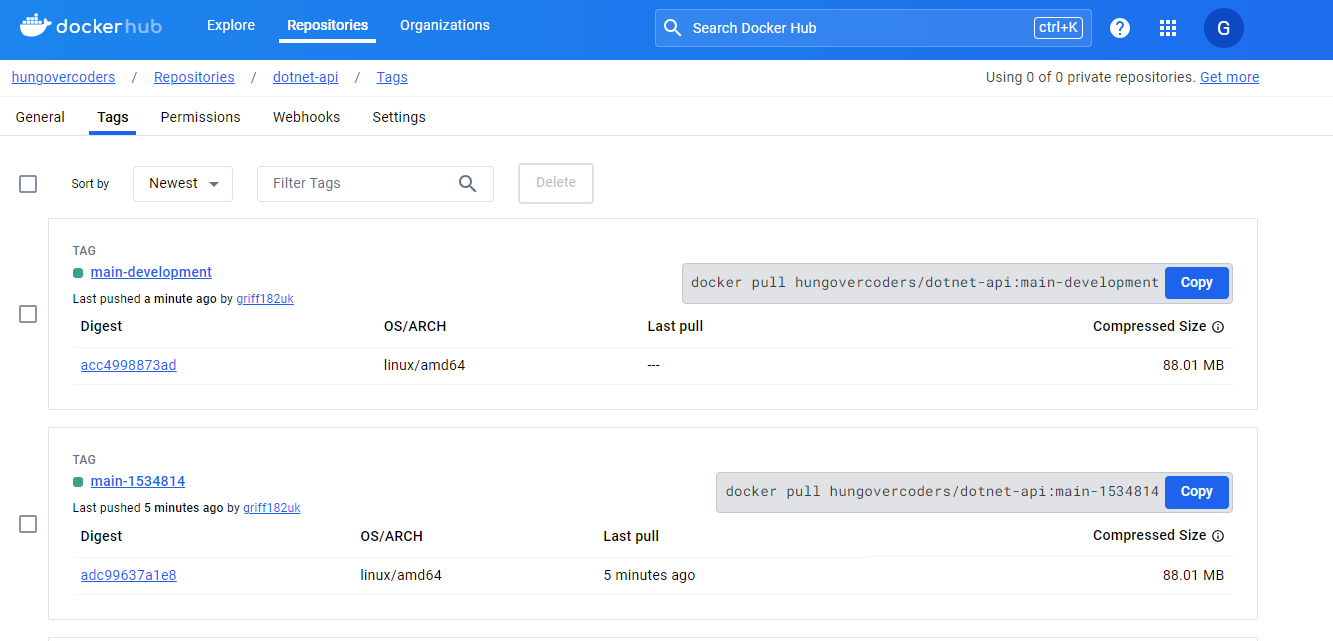
Smoke test driven development at its finest and we can see our latest image in line with our versioning techniques in docker hub.
There is also another script useful for local development called “preview.sh” that I run just to preview the running container.
echo "Starting script: $0..."
set -a
. ./domain.env
set +a
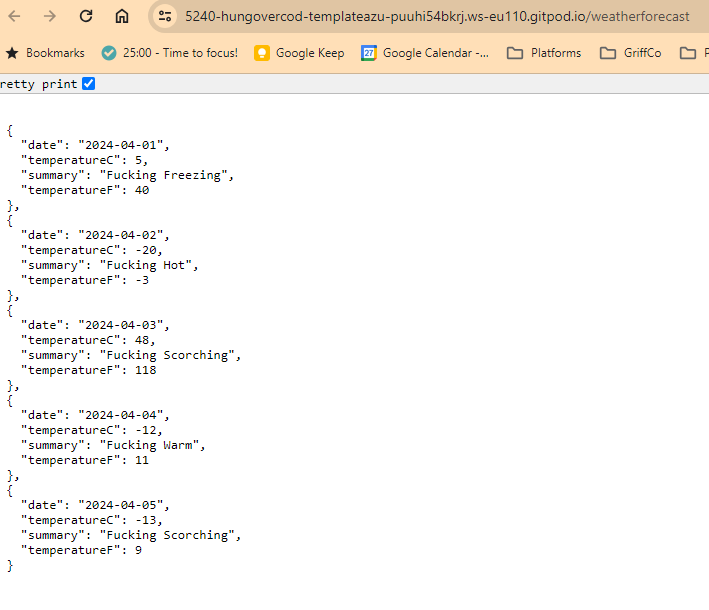
python3 -m webbrowser http://localhost:$PORT/weatherforecast
echo "Completed script: $0."
If we run this script when the docker container is running, we see the following.
Local Infrastructure Development
Pre Requisites
Before you deploy a container app, you will need to setup an Azure Container Environment and associated Log Analytics. You can see this hungovercoders repo here if you want to use terraform to do this or just create them manually for now.
Terraform
I covered in great detail in a previous blog post about how to leverage terraform for local development using cloud development environments. Here I will just highlight the fact I have adjusted the main terraform file to include a container app deploy.
resource "azurerm_resource_group" "rg" {
  name     = local.resource_group_name
  location = var.region
  tags     = local.tags
}

data "azurerm_container_app_environment" "app_environment" {
  name                = local.container_environment_name
  resource_group_name = local.container_environment_resource_group_name
}

resource "azurerm_container_app" "app" {
  name                         = local.container_app_name
  container_app_environment_id = data.azurerm_container_app_environment.app_environment.id
  resource_group_name          = azurerm_resource_group.rg.name
  tags                         = local.tags
  revision_mode                = "Single"
  template {
    container {
      name   = local.container_name
      image  = local.container_image_name
      cpu    = 0.25
      memory = "0.5Gi"
    }
  }
  ingress {
    external_enabled = true
    target_port      = var.port
    traffic_weight {
      latest_revision = true
      percentage      = 100
    }
  }
}

output "azurerm_container_app_url" {
  value = azurerm_container_app.app.latest_revision_fqdn
}

output "azurerm_container_app_revision_name" {
  value = azurerm_container_app.app.latest_revision_name

}
And I have added some extra variables into the infrastructure.sh script to cater for the semantic versioning of the image and the port.
set -e  # Exit immediately if a command exits with a non-zero status.

apply=${1:-False}
echo "Apply: $apply"
set -a
. ./domain.env
set +a

# the following is used to generate a plan against production as part of pull request
# in a production-plan environment
echo "MESSAGE: removing -plan from environment name if present..."
ENVIRONMENT=$(echo $ENVIRONMENT | sed 's/-plan//')

echo "MESSAGE: Setting terraform state variables..."
export TF_VAR_environment=$ENVIRONMENT
export TF_VAR_unique_namespace=$UNIQUE_NAMESPACE
export TF_VAR_organisation=$ORGANISATION
export TF_VAR_region=$ARM_REGION
export TF_VAR_team=$TEAM
export TF_VAR_domain=$DOMAIN
export TF_VAR_app=$APP
export TF_BACKEND_CONTAINER=$ENVIRONMENT
BRANCH=$(git rev-parse --abbrev-ref HEAD)
if [ -n "$(git status --porcelain)" ]; then
    IMAGE_TAG="$BRANCH-development"
else
    COMMIT_ID=$(git log -1 --format="%h")
    IMAGE_TAG="$BRANCH-$COMMIT_ID"
fi

export TF_VAR_image_tag=$IMAGE_TAG
export TF_VAR_port=$PORT
TF_BACKEND_RESOURCE_GROUP="state-rg-$UNIQUE_NAMESPACE"
TF_BACKEND_STORAGE_ACCOUNT="statesa$UNIQUE_NAMESPACE"

echo "MESSAGE: Terraform state variables are..."
echo "Unique Namespace is $TF_VAR_unique_namespace"
echo "Organisation is $TF_VAR_organisation"
echo "Region is $TF_VAR_region"
echo "Environment is $TF_VAR_environment"
echo "Team is $TF_VAR_team"
echo "Domain is $TF_VAR_domain"
echo "Image tag is $TF_VAR_image_tag"
echo "State Storage Account Resource Group is $TF_BACKEND_RESOURCE_GROUP"
echo "State Storage Account is $TF_BACKEND_STORAGE_ACCOUNT"
echo "State Storage Account Container is $TF_BACKEND_CONTAINER"

echo "MESSAGE: Changing to infrastructure directory..."
cd  infrastructure

echo "MESSAGE: Initalising terraform..."
terraform init -backend-config="resource_group_name=$TF_BACKEND_RESOURCE_GROUP" -backend-config="storage_account_name=$TF_BACKEND_STORAGE_ACCOUNT" -backend-config="container_name=$TF_BACKEND_CONTAINER"

echo "MESSAGE: Formatting terraform..."
terraform fmt

echo "MESSAGE: Validating terraform..."
terraform validate

echo "MESSAGE: Planning terraform..."
terraform plan

if [ $apply = True ]; then
    echo "MESSAGE: Applying terraform..."
    terraform apply -auto-approve
fi
If you execute the above script with the parameter set to False, you will get a terraform plan output, if you set it to true, you will actually deploy the infrastructure. Remember we need the image to be available in the docker hub first if we haven’t already pushed that!
Configure Cloud Developer Startup
Right all of our scripts are now setup and ready to use. This means everything else is really easy as they just reference the complexity we have embedded in our scripts. First though we need a cloud development docker file to host our development environment on which looks like the below, installing terraform and the Azure CLI based on the dotnet image (so that we have all that already installed).
FROM gitpod/workspace-dotnet

USER gitpod

# Install Homebrew
RUN /bin/bash -c "$(curl -fsSL https://raw.githubusercontent.com/Homebrew/install/HEAD/install.sh)" && \
    echo 'eval "$(/home/linuxbrew/.linuxbrew/bin/brew shellenv)"' >> ~/.bashrc

# Update Homebrew, Install Terraform & Azure CLI
RUN eval "$(/home/linuxbrew/.linuxbrew/bin/brew shellenv)" && \
    brew update && \
    brew tap hashicorp/tap && \
    brew install hashicorp/tap/terraform && \
    brew upgrade terraform && \
    brew install azure-cli  && \
    brew install aztfexport
Our local pipeline to start our local machine and start the app then can be embedded in a gitpod.yml file like this:
image:
  file: .cde.Dockerfile

tasks:
  - name: Versions
    command: |
      sh ./tools_platform/environment_versions.sh
  - name: Variables
    command: |
      sh ./tools_platform/environment_variables.sh
  - name: Azure CLI
    command: |
      sh ./tools_platform/azure_login_service_principle.sh
      gp sync-done waitonazurecli
  - name: Azure Storage
    command: |
      gp sync-await waitonazurecli
      sh ./tools_platform/infrastructure_state_storage.sh
      gp sync-done waitonnstate
  - name: Terraform
    command: |
      gp sync-await waitonnstate
      sh ./tools_platform/infrastructure.sh
  - name: Container Build
    command: |
      sh ./tools_app/docker_build.sh True False
      gp sync-done containerbuild
  - name: Open App
    command: |
      gp sync-await containerbuild
      sh ./tools_app/preview.sh

vscode:
  extensions:
    - hashicorp.terraform
    - ms-azuretools.vscode-azureresourcegroups
    - ms-vscode.vscode-node-azure-pack
    - formulahendry.code-runner
    - github.vscode-github-actions
    - gitpod.gitpod-desktop
    - redhat.vscode-yaml
    - ms-azuretools.vscode-docker
    - ms-dotnettools.csdevkit
This setups all of our terraform state storage, it does a terraform plan for us AND it also does all of our container build with a container run without pushing just so we know we have a working application immediately.
With the end of this previewing the working URL we asked to open - just to give further proof to the person developing everything works as expected.
Environment Deployment
Reusing Same Scripts for Deployment
Ready for a dumb pipeline? You got it! Just like for our local pipeline above we can now embed our scripts into github actions, keeping them really lean and referencing the exact same scripts we use locally. This is a great developer experience as I have shifted left all the way to my local machine for my deployment pipeline and so I have far greater confidence when committing my code to allow my deployment pipeline to kick in - as I will already have tested it!
The application yaml looks like this, leveraging the docker file that has all the logic to build the app, and then the scripts to do the rest, exactly like we do locally.
name: Application

on:
  workflow_call:
    inputs:
      ORGANISATION:
        required: true
        type: string
      ENVIRONMENT:
        required: true
        type: string
    secrets:
      DOCKER_USERNAME:
        required: true
      DOCKER_PASSWORD:
        required: true

jobs:
  application:
    name: "Application"
    runs-on: ubuntu-latest
    environment: $
    env:
      ENVIRONMENT: $
      ORGANISATION: $
      DOCKER_USERNAME: $
      DOCKER_PASSWORD: $

    steps:
      - name: Checkout
        uses: actions/checkout@v2

      - name: Install Test Requirements
        run: |
          sh ./test/requirements.sh

      - name: "Show Variables"
        run: |
          sh ./tools_platform/environment_variables.sh

      - name: Docker Build
        run: |
          sh ./tools_app/docker_build.sh True True
The infrastructure yaml looks like this, again leveraging the scripts exactly like we do locally.
name: Infrastructure

on:
  workflow_call:
    inputs:
      UNIQUE_NAMESPACE:
        required: true
        type: string
      ORGANISATION:
        required: true
        type: string
      ARM_REGION:
        required: true
        type: string
      ENVIRONMENT:
        required: true
        type: string
    secrets:
      ARM_CLIENT_ID:
        required: true
      ARM_CLIENT_SECRET:
        required: true
      ARM_SUBSCRIPTION_ID:
        required: true
      ARM_TENANT_ID:
        required: true

jobs:
  terraform:
    name: "Infrastructure"
    runs-on: ubuntu-latest
    environment: $
    env:
      ARM_CLIENT_ID: $
      ARM_CLIENT_SECRET: $
      ARM_SUBSCRIPTION_ID: $
      ARM_TENANT_ID: $
      ENVIRONMENT: $
      UNIQUE_NAMESPACE: $
      ORGANISATION: $
      ARM_REGION: $

    steps:
      - name: Checkout
        uses: actions/checkout@v2

      - name: Setup Terraform
        uses: hashicorp/setup-terraform@v1
        with:
          terraform_version: 1.6.3

      - name: "Show Variables"
        run: |
          sh ./tools_platform/environment_variables.sh

      - name: "Terraform Plan"
        if: $
        run: |
          sh ./tools_platform/infrastructure.sh

      - name: Terraform Apply
        if: $
        run: |
          sh ./tools_platform/infrastructure.sh True
As I reuse at least the infrastructure I then have a parent pipeline which calls the above. The only complexity of the code, or multiple lines, really coming from the formatting of the environment variables, but I can live with that.
name: "pipeline"

on:
  push:
    branches:
      - main
    paths-ignore:
      - "README.md"
      - "README-TEMPLATE.md"
      - ".gitpod.yml"
      - ".cde.Dockerfile"
      - "images/**"
      - ".github/workflows/workmanagement.yml"
      - ".github/ISSUE_TEMPLATE/**"
  pull_request:
    branches:
      - main
    paths-ignore:
      - "README.md"
      - "README-TEMPLATE.md"
      - "gitpod.yml"
      - ".cde.Dockerfile"
      - "images/**"
      - ".github/workflows/workmanagement.yml"
      - ".github/ISSUE_TEMPLATE/**"
  workflow_dispatch:

jobs:
  application:
    uses: ./.github/workflows/application.yml
    with:
      ORGANISATION: $
      ENVIRONMENT: "development"
    secrets:
      DOCKER_USERNAME: $
      DOCKER_PASSWORD: $

  development-infrastructure:
    uses: ./.github/workflows/infrastructure.yml
    needs: application
    with:
      UNIQUE_NAMESPACE: $
      ORGANISATION: $
      ARM_REGION: $
      ENVIRONMENT: "development"
    secrets:
      ARM_CLIENT_ID: $
      ARM_CLIENT_SECRET: $
      ARM_SUBSCRIPTION_ID: $
      ARM_TENANT_ID: $

  production-plan-infrastructure:
    if: github.ref != 'refs/heads/main'
    uses: ./.github/workflows/infrastructure.yml
    needs: development-infrastructure
    with:
      UNIQUE_NAMESPACE: $
      ORGANISATION: $
      ARM_REGION: $
      ENVIRONMENT: "production-plan"
    secrets:
      ARM_CLIENT_ID: $
      ARM_CLIENT_SECRET: $
      ARM_SUBSCRIPTION_ID: $
      ARM_TENANT_ID: $

  production-infrastructure:
    if: github.ref == 'refs/heads/main'
    uses: ./.github/workflows/infrastructure.yml
    needs: development-infrastructure
    with:
      UNIQUE_NAMESPACE: $
      ORGANISATION: $
      ARM_REGION: $
      ENVIRONMENT: "production"
    secrets:
      ARM_CLIENT_ID: $
      ARM_CLIENT_SECRET: $
      ARM_SUBSCRIPTION_ID: $
      ARM_TENANT_ID: $
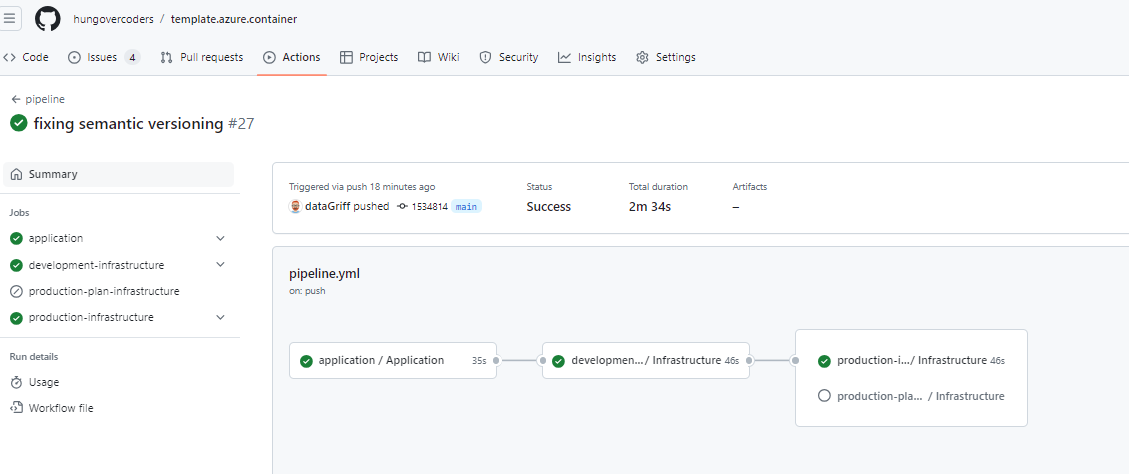
The github actions pipeline then, just like the local pipeline, succeeds as expected.
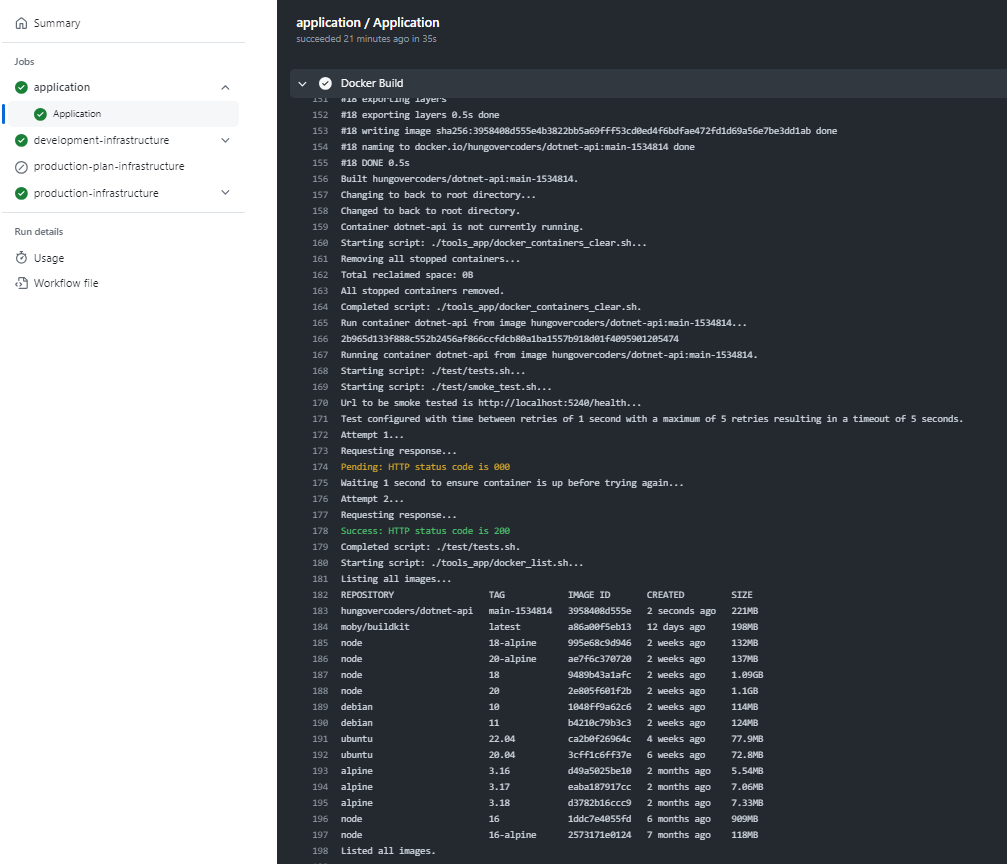
Tests During Build
You can run a docker container in a github action, therefore we’re actually performing an integration test of sorts during the very first build stage in github actions. Not only does the container build, but it runs and tests on this initial github action phase. Talk about shifting left!
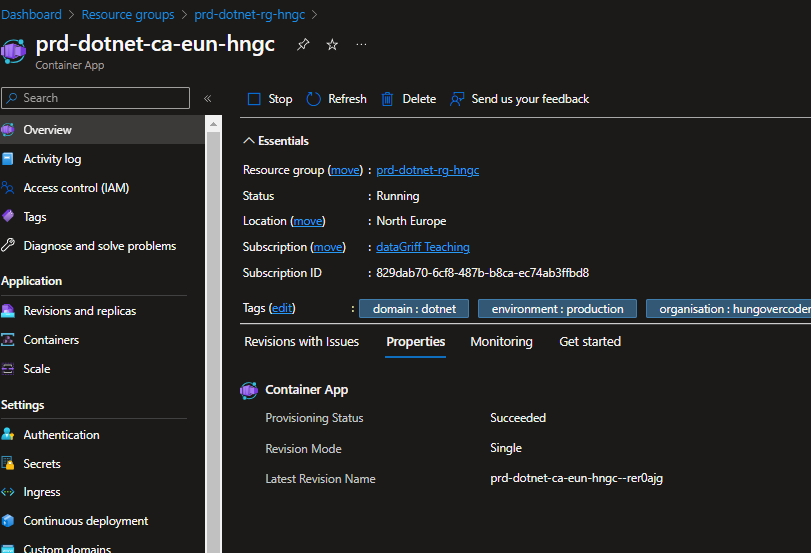
Azure Outcome
Once the pipeline has finished we get an azure container app:
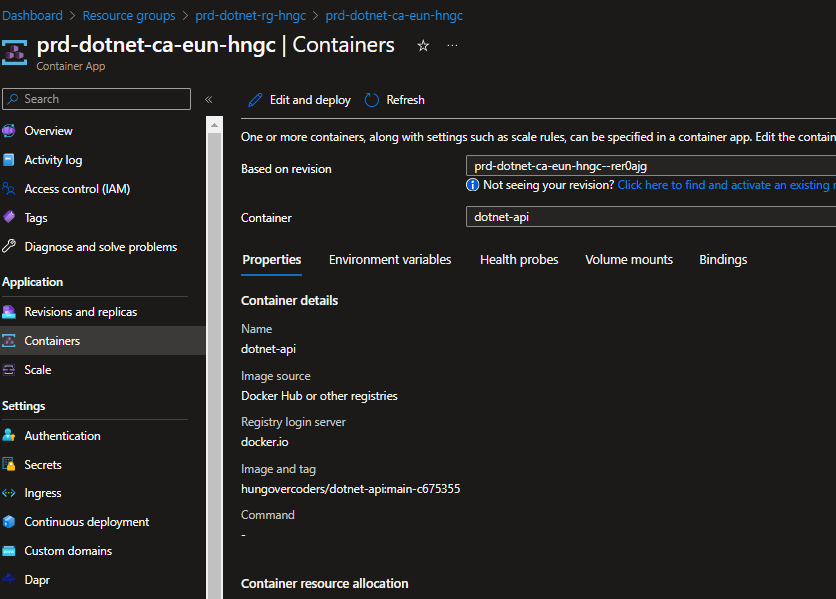
That references an image…
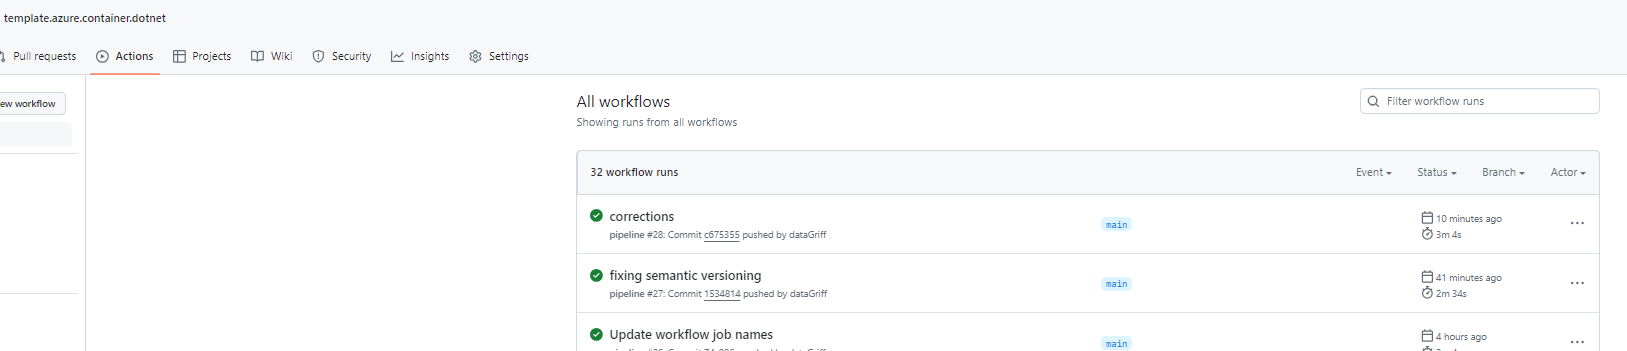
That was the latest commit in our github action…
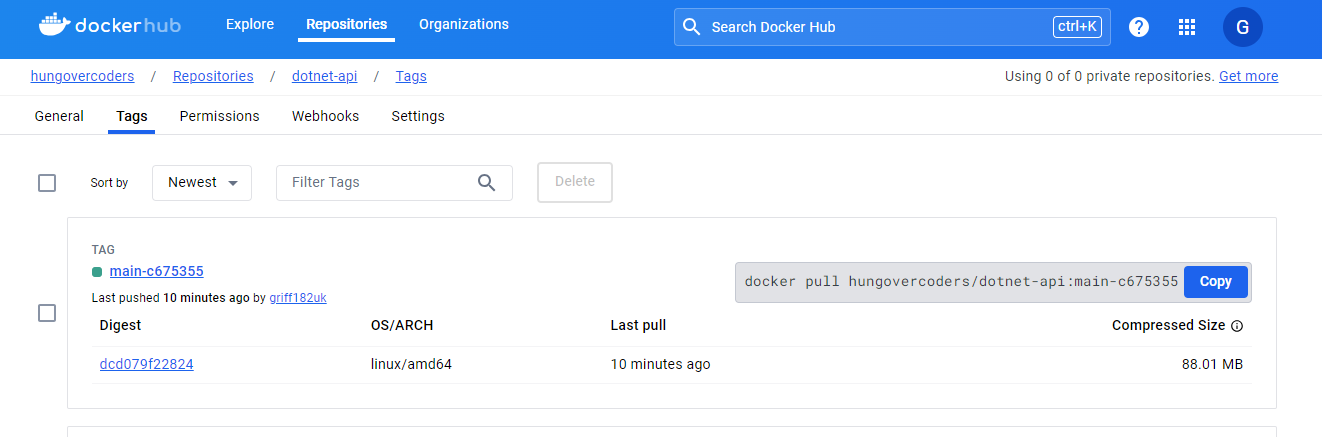
And the latest one we see in docker hub!
To be Continued
There are a number of add-ons I want to include in this method of development such as far better testing, security and complexity measures. My semantic versioning also leaves a lot to be desired so I will want to improve on that. Ultimately though my development experience is now a dream come true for my future whiskey and doggo APIs, there are a number of champagne bottles littering my hungovercoder office in celebration.