
.Net Core 7 API | Create a distillery lookup API with .Net Core
Well I was definitely a hungovercoder yesterday and it was quite difficult to stare at lists of distilleries without wanting a bit of hair of the dog… Anyway below explains how to create a simple lookup API GET request using .Net core. I am not a .Net ninja, nor am I an API aficionado (yet!), but the following will create you a basic and currently very insecure API. I hope to investigate APIs further in .Net and follow-up with better practice approaches in the future. The ongoing implementation of this API can be found in the hungovercoders github organisation under whiskey.reviews.
- Pre-Requisites
- Plan the API
- Codebase Overview
- Create the API Starter Template
- Install Packages
- Create the Distillery Model
- Add Distillery Data
- Create the Whiskey Controller
- Test our API
- Get our Swagger On
Pre-Requisites
Plan the API
The API is going to allow us to retrieve a list of distileries. Therefore the first and only endpoint for now is going to be simple GET of a list of distilleries. We can later use this to provide validation and dropdowns.
| Behaviour | HTTP Verb | URI |
|---|---|---|
| Get distilleries | GET | https://api.myurl/v1/distilleries |
Codebase Overview
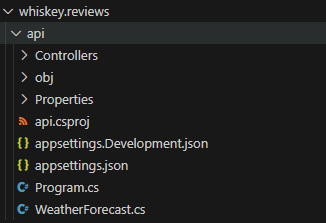
The codebase we end up with is going to look something like the following. We will autogenerate this with some quick start terminal commands but I always think its good to have the destination in mind to understand what we’re building.
whiskey.reviews
│   README.md
|   .gitignore
└───api
│   │   Program.cs
│   │   api.csproj
│   │   appsettings.json
│   │   appsettings.Development.json
│   └───Models
|   |   |   Distillery.cs
│   └───DataSource
|   |   |   distilleries.json
│   └───Controllers
|   |   |   WhiskeyController.cs
The api folder will contain the resources for the api. The Models folder will contain our object that represents the distilleries we’ll be retrieving. The Controller folder will then contain all the endpoints that the api will expose and how each API verb behaves when it is interacted with. It is the Program.cs file that launches the program and contains the configuration and settings of the API.
Create the API Starter Template
In your IDE run the following commands in a terminal to setup your new API and then change directory to start working within it.
dotnet new webapi -n api
cd api
Once you have run the above you should see the basic skeleton of the API setup in your directory as per below.
To make sure that this all runs correctly on your local machine, copy and paste the following into the Properties/launchSettings.json file. This will ensure the ports 3000 and 3001 are used for http and https respectively.
{
  "$schema": "https://json.schemastore.org/launchsettings.json",
  "iisSettings": {
    "windowsAuthentication": false,
    "anonymousAuthentication": true,
    "iisExpress": {
      "applicationUrl": "https://localhost:3001",
      "sslPort": 3001
    }
  },
  "profiles": {
    "http": {
      "commandName": "Project",
      "dotnetRunMessages": true,
      "launchBrowser": true,
      "launchUrl": "swagger",
      "applicationUrl": "http://localhost:3000",
      "environmentVariables": {
        "ASPNETCORE_ENVIRONMENT": "Development"
      }
    },
    "https": {
      "commandName": "Project",
      "dotnetRunMessages": true,
      "launchBrowser": true,
      "launchUrl": "swagger",
      "applicationUrl": "https://localhost:3001;http://localhost:3000",
      "environmentVariables": {
        "ASPNETCORE_ENVIRONMENT": "Development"
      }
    },
    "IIS Express": {
      "commandName": "IISExpress",
      "launchBrowser": true,
      "launchUrl": "swagger",
      "environmentVariables": {
        "ASPNETCORE_ENVIRONMENT": "Development"
      }
    }
  }
}
Then in the Program.cs file add this line before the app is built to ensure the URLs in the launch settings are reflected.
builder.WebHost.UseUrls("http://localhost:3000", "https://localhost:3001");

var app = builder.Build();
Run the following to make sure that it builds correctly:
dotnet build
Then run the following to run the API
dotnet run
You can test it is then working by going to the following address https://localhost:3001/swagger/index.html and you should see the swagger for the example weather API as per below.
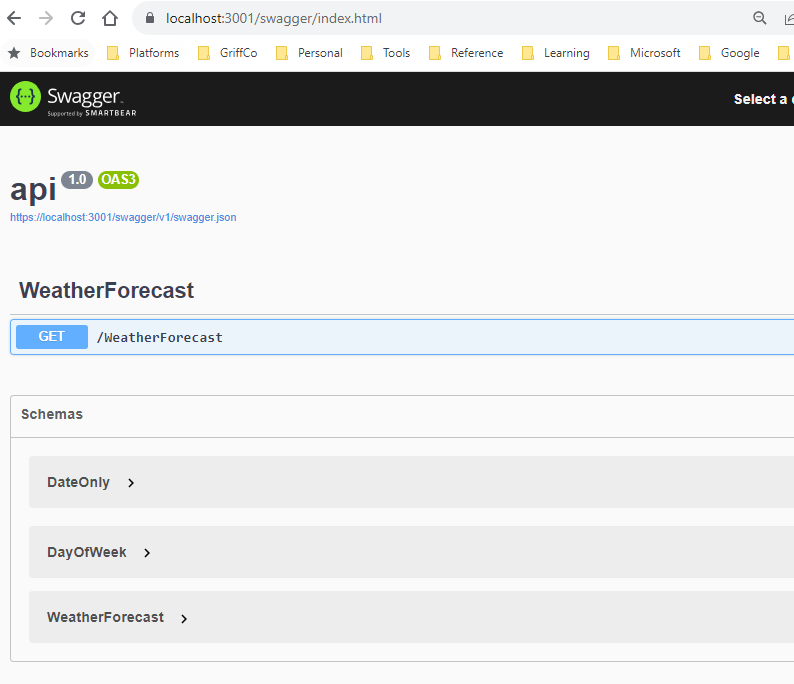
Once you have completed this test (and had a play around if you want), remove the WeatherForecast.cs file and the Controllers/WeatherForecastController.cs files. We will be replacing all of this with our distillery model!
Install Packages
We’re going to need some packages for our API to work so lets install them all now. Run the following in a terminal in your api directory.
dotnet add package Microsoft.OpenAPI
dotnet add package Swashbuckle.AspNetCore.Annotations
dotnet add package Microsoft.Extensions.Caching.Memory
The OpenAPI and Swashbuckle packages will allow us to document our API with swagger. The caching memory package will allow us to cache a reusable lists for our distilleries.
Create the Distillery Model
The model we are going to create is for our distillery lookup. Create a Models directory and in this create a file called Distillery.cs. Add the following code which will represent our distilleries.
using System.Text.Json.Serialization;
using System.ComponentModel.DataAnnotations;
namespace api.Models
{
/// <summary>
/// Represents a distillery.
/// </summary>
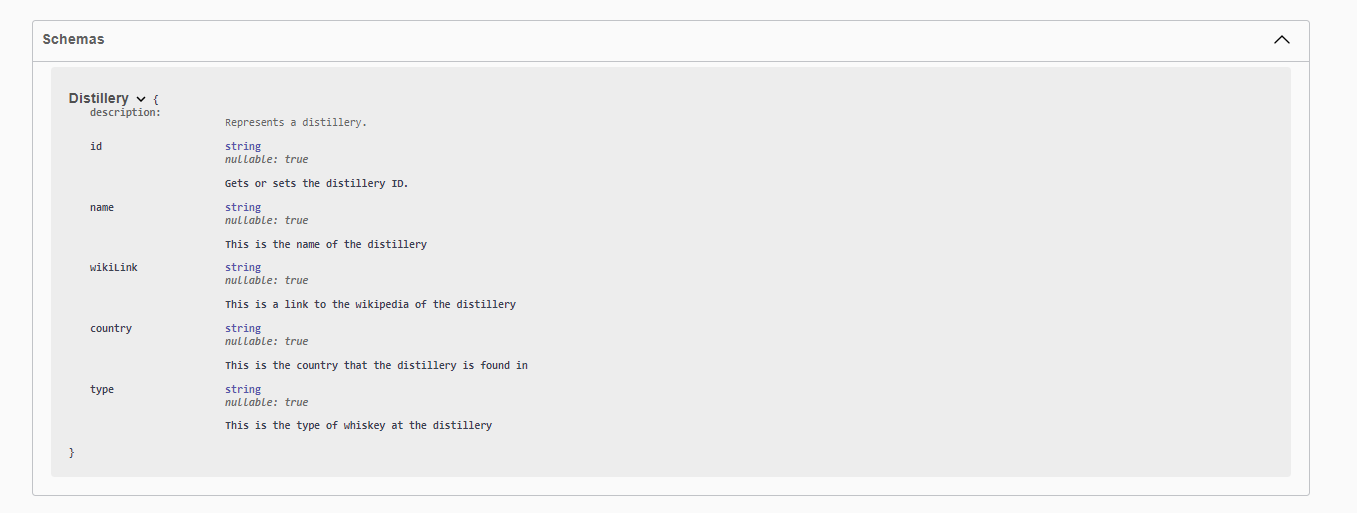
public class Distillery
{
/// <summary>
/// Gets or sets the distillery ID.
/// </summary>
[JsonPropertyName("id")]
public string Id { get; set; }
/// <summary>
/// This is the name of the distillery
/// </summary>
[JsonPropertyName("name")]
public string Name { get; set; }
/// <summary>
/// This is a link to the wikipedia of the distillery
/// </summary>
[JsonPropertyName("wikiLink")]
public string? WikiLink { get; set; }
/// <summary>
/// This is the country that the distillery is found in
/// </summary>
[JsonPropertyName("country")]
public string? Country { get; set; }
/// <summary>
/// This is the type of whiskey at the distillery
/// </summary>
[JsonPropertyName("type")]
public string? Type { get; set; }
}
}
This class setups up a distillery object which has five properties. The JsonPropertyName is leveraging the System.Text.Json.Serialization which states what the name of the properties will be when serializing and deserializing the class. You’ll notice this in the next section where our distillery JSON data returned matches the casing in the JsonPropertyName. The XML comments around the class and each property will eventually be seen in our Swagger documentation.
Add Distillery Data
Create a distilleries.json file under a api/DataSource directory. This is going to contain lookup data for our distilleries and it is going to be read only. In the file add the following data:
[
  {
    "id": "glenmorangie",
    "name": "Glenmorangie",
    "wikiLink": "/wiki/Glenmorangie_distillery",
    "country": "Scotland",
    "type": "Single Malt"
  },
  {
    "id": "clontarf1014",
    "name": "Clontarf 1014",
    "wikiLink": "/wiki/Clontarf_(whiskey)",
    "country": "Ireland",
    "type": "Blended"
  },
  {
    "id": "hakushu",
    "name": "Hakushu",
    "wikiLink": "/wiki/Hakushu_distillery",
    "country": "Japan",
    "type": "Single grain Irishs"
  }
]
If you want to get a big list of distilleries you can use this in the original repo which I have taken by scraping the wikipedia list of whiskey brands page.
Create the Whiskey Controller
Create a file called WhiskeyController.cs under the Controllers directory. This is going to hold our endpoints for interacting with the API. Add the following code to the file which will add a single GET endpoint to retrieve our distilleries. The method utilises local caching so once the distilleries have been looked up from storage subsequent calls get the data from the cache. The comments above the GetDistilleries method form part of our Swagger documentation which we will see in the next section where we test the API. The URL of the API will be the base domain plus api/v1, which is declared at the APIController route. The v1 style path is to allow versioning. The route for the distilleries GET request will be at “distilleries” as declared by the route property above the method, so the path for this request will be api/v1/distilleries.
using System.Net;
using Microsoft.AspNetCore.Http;
using Microsoft.AspNetCore.Mvc;
using api.Models;
using Swashbuckle.AspNetCore.Annotations;
using System;
using System.Collections.Generic;
using System.IO;
using System.Text.Json;
using Microsoft.Extensions.Caching.Memory;

namespace api.Controllers
{
    [Route("api/v1")] //this is the base route
    [ApiController]
    public class WhiskeyController : ControllerBase
    {
        private readonly IMemoryCache _cache;

        public WhiskeyController(IMemoryCache cache)
        {
            _cache = cache;
        }

        /// <summary>
        /// Gets list of distilleries
        /// </summary>
        /// <remarks>
        /// Sample request:
        ///
        ///     GET api/v1/distilleries
        /// </remarks>
        /// <response code="200">Successfully returned distillers</response>
        /// <returns>Distilleries</returns>
        [Route("distilleries")]
        [HttpGet]
        public async Task<List<Distillery>> GetDistilleries()
        {
            const string cacheKey = "distilleries";
            if (!_cache.TryGetValue(cacheKey, out List<Distillery> _distilleries))
            {
                Console.WriteLine("Retrieving data from storage...");
                string jsonString = await System.IO.File.ReadAllTextAsync("Datasource\\distilleries.json");
                _distilleries = JsonSerializer.Deserialize<List<Distillery>>(jsonString);

                _cache.Set(cacheKey, _distilleries, new MemoryCacheEntryOptions
                {
                    AbsoluteExpirationRelativeToNow = TimeSpan.FromDays(365)
                });
            }
            else
            {
                Console.WriteLine("Retrieving data from cache...");
            }
            return _distilleries;
        }
    }
}
In order to leverage the caching you will need to add this to the services when the app is built in the Program.cs file. Add the following line above the AddControllers() method call in the Program.cs file to ensure the memory cache service is available.
//Ensuring cache is available for lookup
builder.Services.AddMemoryCache();
// Add services to the container.
builder.Services.AddControllers();
Test our API
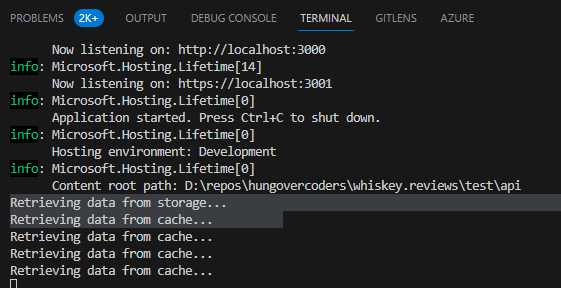
In the terminal open up your api directory and run dotnet build to make sure everything is building correctly. Then run dotnet run which should start up your API. Navigate to the URL we have stated and go to the swagger docs at https://localhost:3001/swagger/index.html.
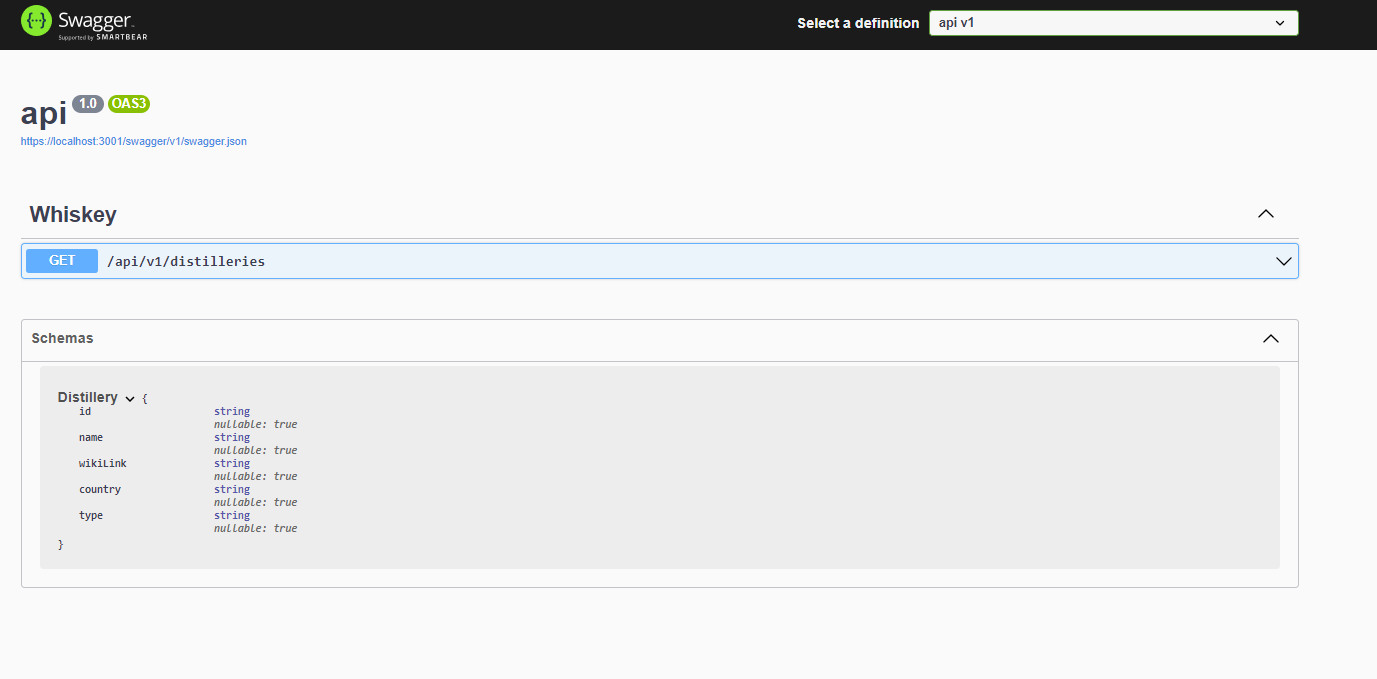
You should see the swagger as below.
If you “Try it Out” and Execute the GET the request you will see the list of distilleries returned.
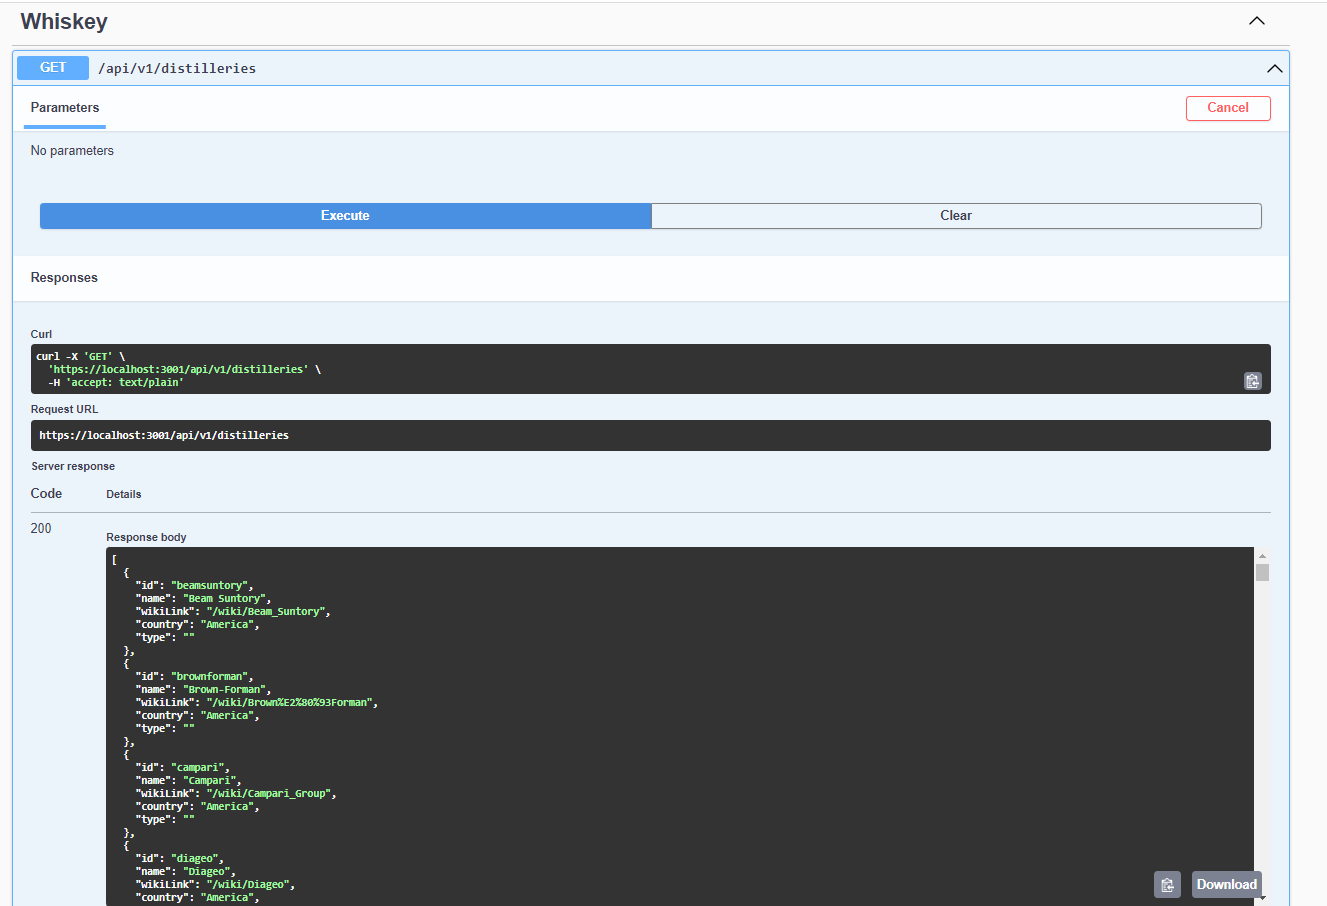
You’ll also notice in your console logs that if you perform repeat GET requests against the API, only the first will write “retrieving from storage” and the rest will write “retrieving from cache” as we are caching this lookup data in the app.
Get our Swagger On
You’ll notice that none of the documentation we added to our API is currently present in the Swagger. To add this, add thw following using statement in the Program.cs file.
using System.Reflection;
Then replace the AddSwagger code with this so that when the services are being built they will leverage the documentation we have provided for the API.
builder.Services.AddSwaggerGen(options =>
{
    options.EnableAnnotations();

    var xmlFilename = $"{Assembly.GetExecutingAssembly().GetName().Name}.xml";
    options.IncludeXmlComments(Path.Combine(AppContext.BaseDirectory, xmlFilename));
});
You’ll also need to edit the project file XML by adding the GenerateDocumentationFile property group and setting it to true.
  <PropertyGroup>
    <TargetFramework>net7.0</TargetFramework>
    <Nullable>enable</Nullable>
    <ImplicitUsings>enable</ImplicitUsings>
    <GenerateDocumentationFile>true</GenerateDocumentationFile>
  </PropertyGroup>
Now run the application again with:
dotnet run
Now when we go back to the API and refresh the swagger. We should see some basic documentation based on the comments above our code in the controller class.

We should also see documentation on the distiller object too as we have added the comments to the class.
We can now look to call this API to get distillery information potentially for lookups or validation on some incoming whiskeys…