
Terraform Azure Data Learning Platform
I am quite often creating various data assets like data lake storage, databricks etc on Azure for learning. I want to automate the provision of these to make my life easier and so I decided to crack open a can and learn some terraform on Azure with github actions to make this repeatable!
- Pre-Requisites
- Diagram
- Terraform an Azure Resource Group with Local State
- Setup and Deploy Through Terraform Cloud
- Deploy Resource Group with Github Action
- Deploy Azure Data Platform Assets
Pre-Requisites
- You’ll need an azure subscription to host your data infrastructure and be an owner at the subscription level.
- You’ll need an IDE like visual studio code.
- You’ll need to install terraform.
- You’ll need a github account for source control and deployment with github actions.
- You’ll want a hashicorp developer account and terraform cloud account to host your state files.
- Ideally you’ll want a local environment variable for your AZURE_SUBSCRIPTION_ID. Otherwise wherever you see the bash command %AZURE_SUBSCRIPTION_ID% just replace it with your actual azure subscription id.
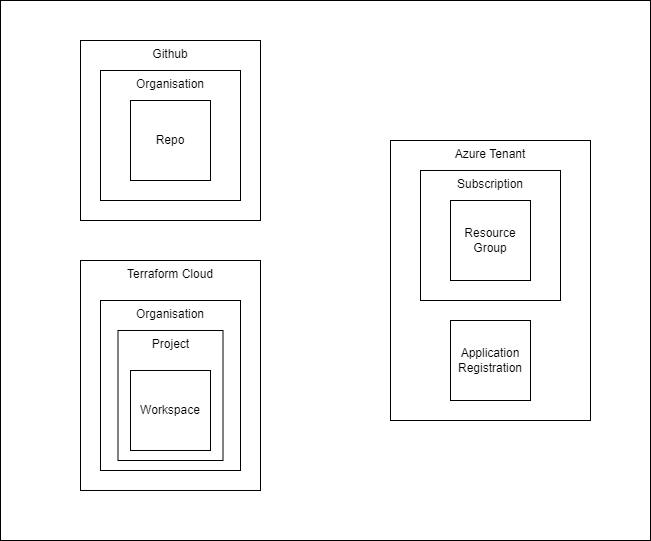
Diagram
- We’re going to be deploying our infrastructure assets to Azure in a resource group in a subscription.
- We’re going to create an application registration in Azure that will have the credentials to interact with the Azure subscription.
- We’re going to be storing the state of our infrastructure in terraform cloud. This will interact with the Azure infrastructure using the Azure application registration credentials that will be stored as environment variables in terraform cloud scoped to the terraform cloud project.
- We’re going to be leveraging github for source control and deployment with github actions. The github action will interact with the state deploy in terraform cloud using a secure API key generated from a terraform cloud team that is part of the terraform organisation.
Terraform an Azure Resource Group with Local State
First lets create the simplest possible deployment possible using local state. Create a new directory on your local machine called platform.azure.data and initialise a git repo with a README.md. The end file structure is going to look like the following:
azure.platform.data
│   README.md
|   .gitignore
|   main.tf
|   outputs.tf
|   variables.tf
|   versions.tf
First add a .gitignore file for terraform which can be found at the useful .gitnore repository at github.
Create a versions.tf file and add the following code:
terraform {

  required_providers {
    azurerm = {
      source  = "hashicorp/azurerm"
      version = "~>3.10.0"
    }
  }

  required_version = ">= 1.2.3"
}

provider "azurerm" {
  features {}
}
This file sets the providers required for this particular deploy which is Azure. You can see the huge amount of providers available at the terraform registry.
Create a variables.tf file and add the following code:
variable "region" {
  type        = string
  default     = "northeurope"
  description = "The is the Azure region the resources will be deployed into."
  validation {
    condition     = contains(["northeurope", "westeurope"], var.region)
    error_message = "The region is not in the correct region."
  }
}

variable "environment" {
  type        = string
  default     = "learning"
  description = "The is the environment the resources belong to. e.g. learning, development, production."
  validation {
    condition     = contains(["learning", "development", "production"], var.environment)
    error_message = "The environment is not valid."
  }
}

variable "team" {
  type        = string
  default     = "datagriff"
  description = "The is the team that own the resources."
  validation {
    condition     = contains(["datagriff", "hungovercoders", "dogadopt"], var.team)
    error_message = "The team is not valid."
  }
}

variable "organisation" {
  type        = string
  default     = "datagriff"
  description = "The is the organisation that owns the resources."
  validation {
    condition     = contains(["datagriff", "hungovercoders", "dogadopt"], var.organisation)
    error_message = "The organisation is not valid."
  }
}

variable "domain" {
  type        = string
  default     = "test"
  description = "The is the business problem domain being solved by the resources."
}

variable "azure_namespace" {
  type        = string
  default     = "dgrf"
  description = "The is the unique namespace added to resources."
}

locals {
  region_shortcode      = (var.region == "northeurope" ? "eun" : var.region == "westeurope" ? "euw" : "unk")
  environment_shortcode = (var.environment == "learning" ? "lrn" : var.environment == "development" ? "dev" : var.environment == "production" ? "prd" : "unk")
  resource_group_name   = "${local.environment_shortcode}-${var.domain}-rg"
  tags = {
    environment = var.environment
    team        = var.team
    domain      = var.domain
  }
}
Take a look at the variables in the file and change any of them to suit your needs. This may include the region if you need to deploy somewhere other than the european regions and the team or organisation may need amending. I usually leave these tags even when testing as it keeps my mind focused on the boundaries I need in my infrastructure, but feel free to take them out entirely.
This variables file will feed into our main.tf file to make them reusable and keep the resource logic quite clean. Notice at the bottom we have declared “locals” which are construction some common resource component names and tags that we want to be consistent everywhere.
Create a main.tf file and add the following code:
resource "azurerm_resource_group" "rg" {
  name     = local.resource_group_name
  location = var.region
  tags     = local.tags
}
This file now has a really simple structure for an azure resource group, taking its configuration from the variables.tf file. The alias of the resource group “rg” will come in useful later when we reference its variables for subsequent resources.
Create an outputs.tf file and add the following code:
output "resource_group_id" {
  value = azurerm_resource_group.rg.id
}
Next run the following terraform commands:
terraform init
terraform fmt
terraform validate
The terraform init will register the required provider files locally, much like a python library or .net package, but because of our .gitignore file these will not be committed to source. It will also created a terraform lock file which will remain under source control that states the required versions of the providers. The terraform fmt command will format all your terraform files to ensure they are correct and return a list of any its needed to format. The terraform validate command will then check that your terraform code is valid and return any issues it finds.
You’ll now need to login to your azure subscription using the CLI and set the subscription you want to deploy your infrastructure into.
az login
az account set --subscription "%AZURE_SUBSCRIPTION%"
az account show
Next run the following terraform command
terraform plan
Finally terraform plan will generate a plan for the action that the terraform deploy will take. During this command you’ll see some transient state files get created locally and then disappear. Terraform plan is a great feature as it helps you understand what state changes are going to occur.
Now you are ready to deploy your resource group with the following command:
terraform apply -auto-approve
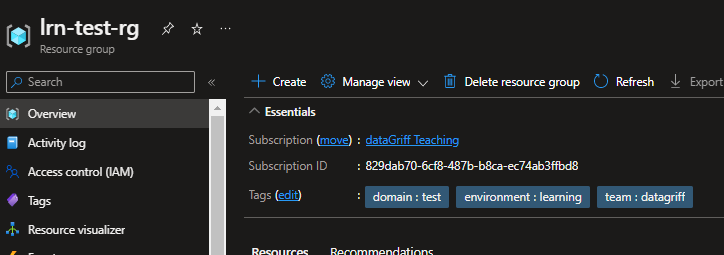
The -auto-approve parameter removes the need for you to have to manually input “yes” in the console when deploying. Once this command has finished you should see your resource group in the portal with all the lovely tag goodness we gave it.
You’ll also notice a state file has been created locally called “terraform.tfstate”. If you look in this file it basically contains the ARM template for the resource group you deployed. This file is also not included in source control as it is part of the .gitgnore configuration. This is because this is how terraform manages the state of the resources you want to deploy, source control should only contain the mechanisms of the desired state declaration, so we need to manage the actual state of the resources in external files somewhere else. Traditionally this state file management will have been managed by bespoke external stores such as Azure storage, but now it is recommended you store you infrastructure state in Terraform cloud…
Before we continue though, run the following to remove the resource group you deployed as we’ll be changing the state storage in the following section:
terraform destroy
Setup and Deploy Through Terraform Cloud
Now we are going to manage state remotely in terraform cloud instead of in a local file. This will allow us to perform automated deployment using remote techniques such as github actions. First then, to avoid confusion, remove the terraform.tfstate file from your local repo.
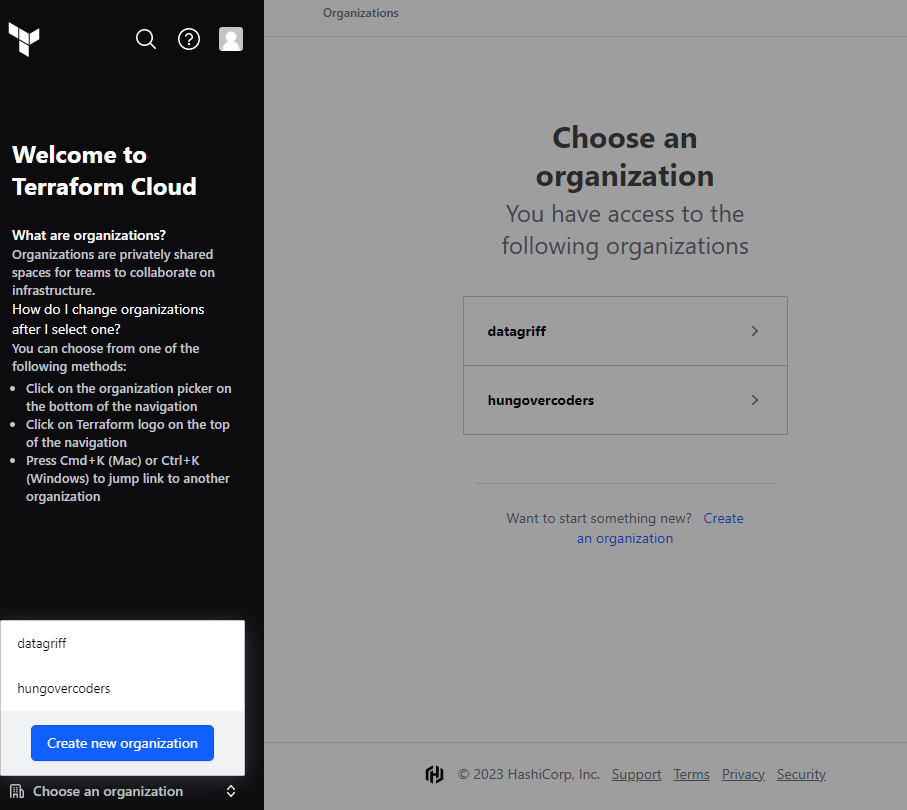
Next login to terraform cloud and create your organisation if you don’t have one already.
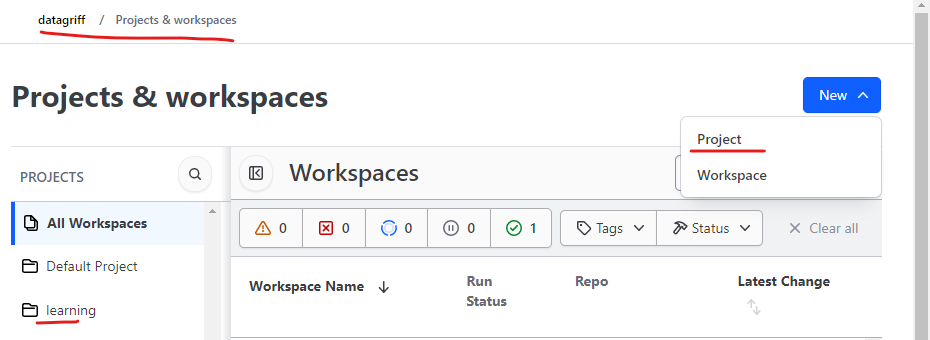
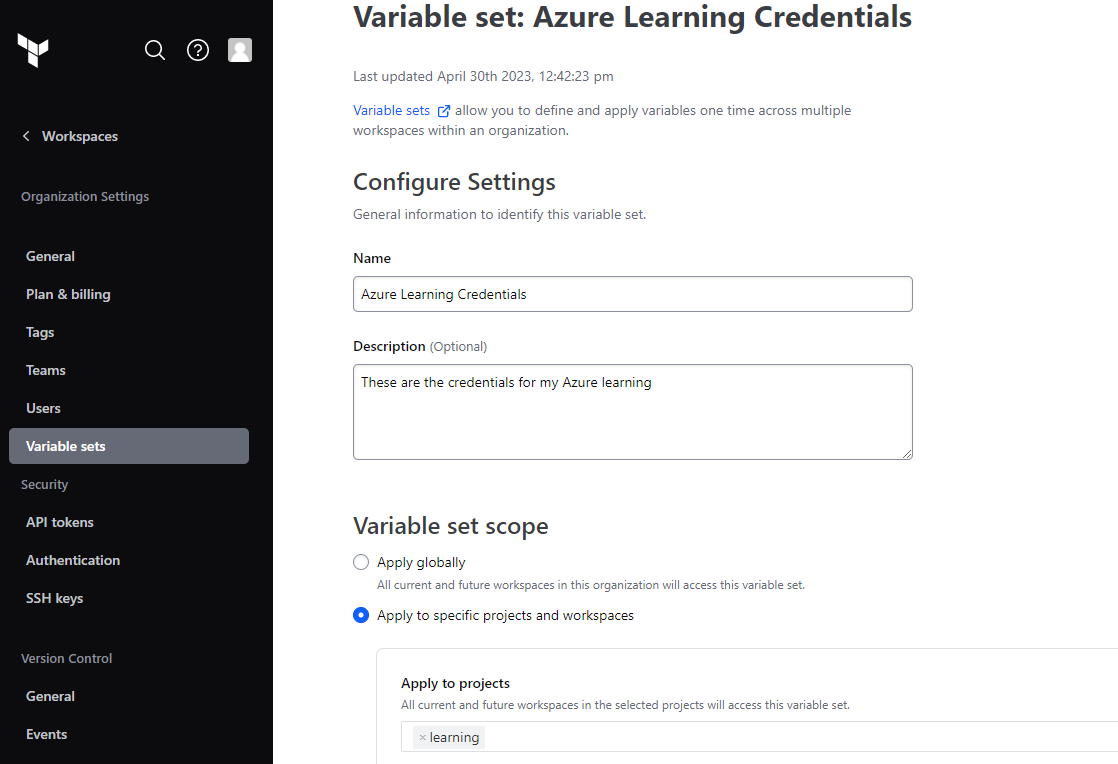
Navigate to your new organisation and create a project called “learning”. We could use the default project but I am going to isolate my learning material into a specific location, along with any other environments I create later.
We are now going to create an application registration in azure with contributor credentials to deploy assets into azure. For this I am going to scope it at the subscription I am learning in and run the following command. If you’re not already logged in to Azure you’ll need to do tha again with “az login”.
az ad sp create-for-rbac --role="Contributor" --scopes="/subscriptions/%AZURE_SUBSCRIPTION_ID%" --name "aprg-lrn-cont"
In terraform cloud create a variable set called “Azure Learning Credentials” and apply it to the learning project.
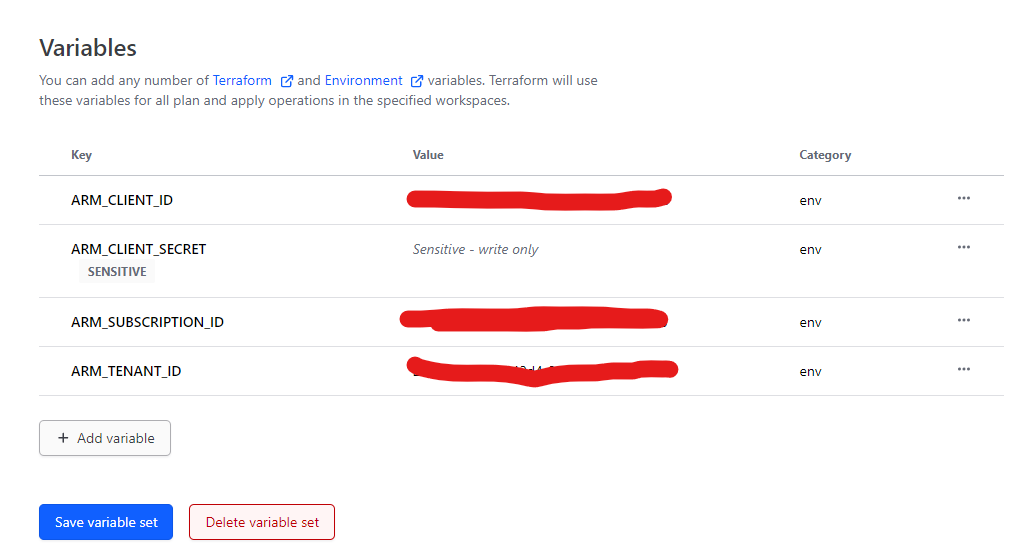
Then add environment variables to the terraform cloud variable set that came out of the azure CLI command above. Make sure you set them as environment variables and the ARM_CLIENT_SECRET is set to sensitive.
| CLI Command Output Name | Terraform Cloud Variable Name |
|---|---|
| appId | ARM_CLIENT_ID |
| password | ARM_CLIENT_SECRET |
| tenant | ARM_TENANT_ID |
You will also need to add ARM_SUBSCRIPTION_ID as a variable and add your Azure subscription id to this. Save your variable set once completed.
| Terraform Cloud Variable Name |
|---|
| ARM_SUBSCRIPTION_ID |
Your variable keys and their values should look something like the below. Make sure the category is env.
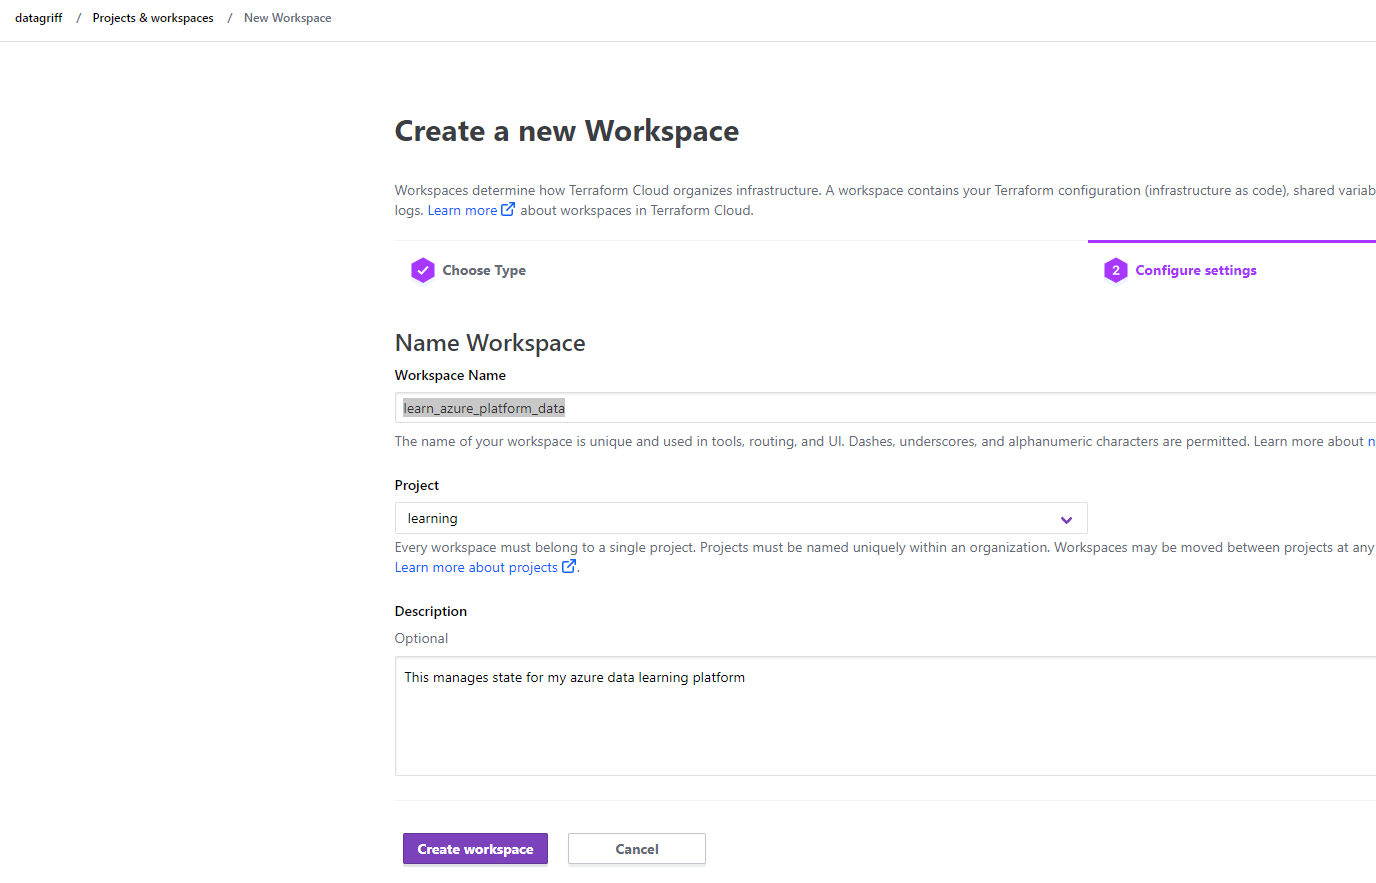
Create a workspace and we’re going to use API-diven-workflow as the option on the first page and not the recommended version control workflow. This is currently a personal preference as I want to manage all deployment visibility in github actions (see later section). Name the workspace learn_azure_platform_data and ensure it is in the learning project - which as well as organising our workspaces it will also be able to leverage the environment variables we setup previously.
Amend the version.tf file to now use terraform cloud to manage state instead of it being managed locally. You’ll also need to update the myorganisation value below to the name of the one you created.
{

  cloud {
    organization = "myorganisation"

    workspaces {
      name = "learn_azure_platform_data"
    }
  }

  required_providers {
    azurerm = {
      source  = "hashicorp/azurerm"
      version = "~>3.10.0"
    }
  }

  required_version = ">= 1.2.3"
}

provider "azurerm" {
  features {}
}
To confirm this now works remnotely you will need to first run terraform login and follow the instructions.
terraform login
Then run apply.
terraform apply
Everything should now be working except you won’t have a state file locally, this will be held in your terraform cloud workspace.
Deploy Resource Group with Github Action
If you haven’t already ensure your local repository is synched to your github account. I called my repo platform.azure.data.
Next create a team API token in your terraform cloud organisation. Copy this value.
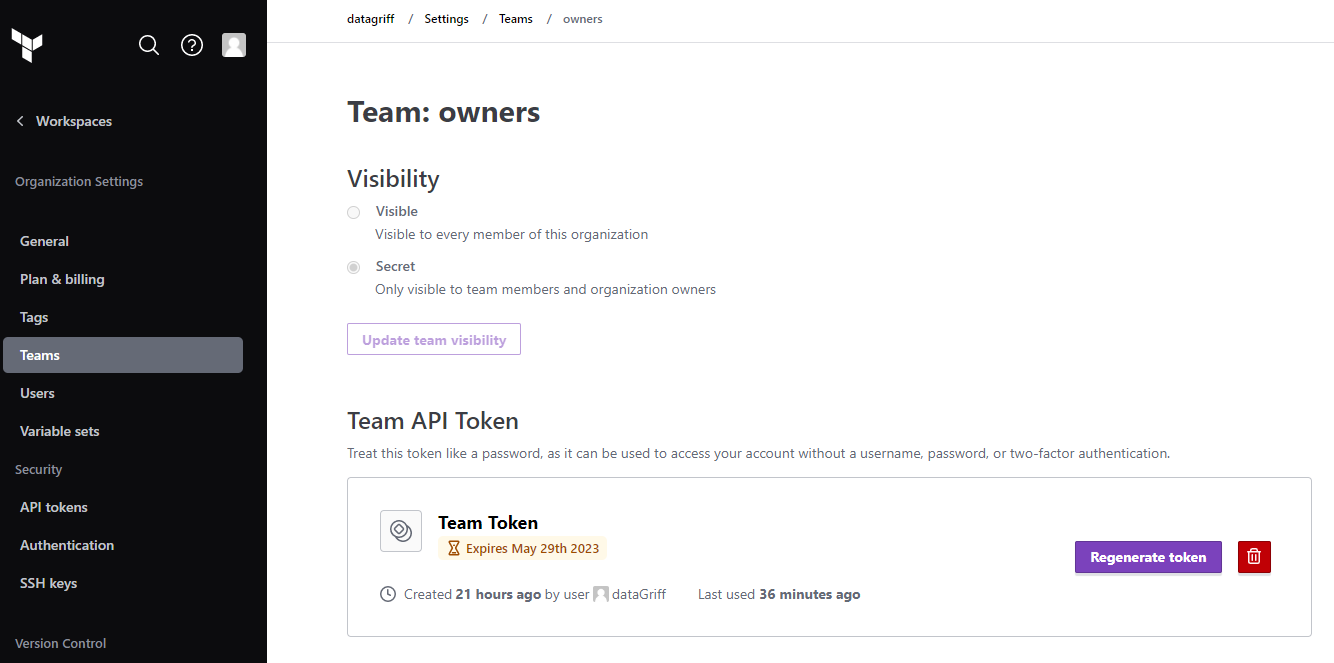
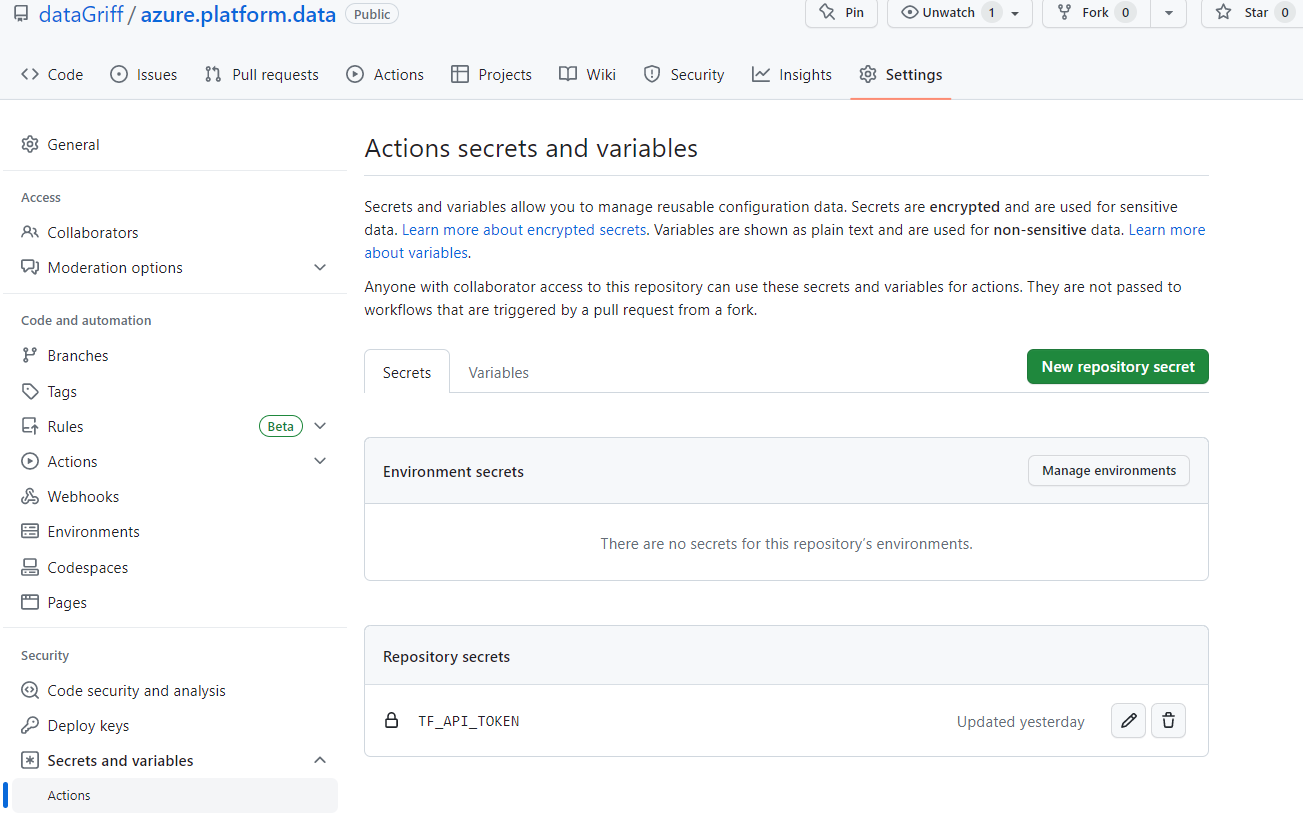
Add the APi token from terraform cloud to your github repository under settings > security > secrets and vaiables > actions and name it “TF_API_TOKEN”. Paste in the value from the team API token above.
In your github repository go to actions and choose a Terraform workflow.
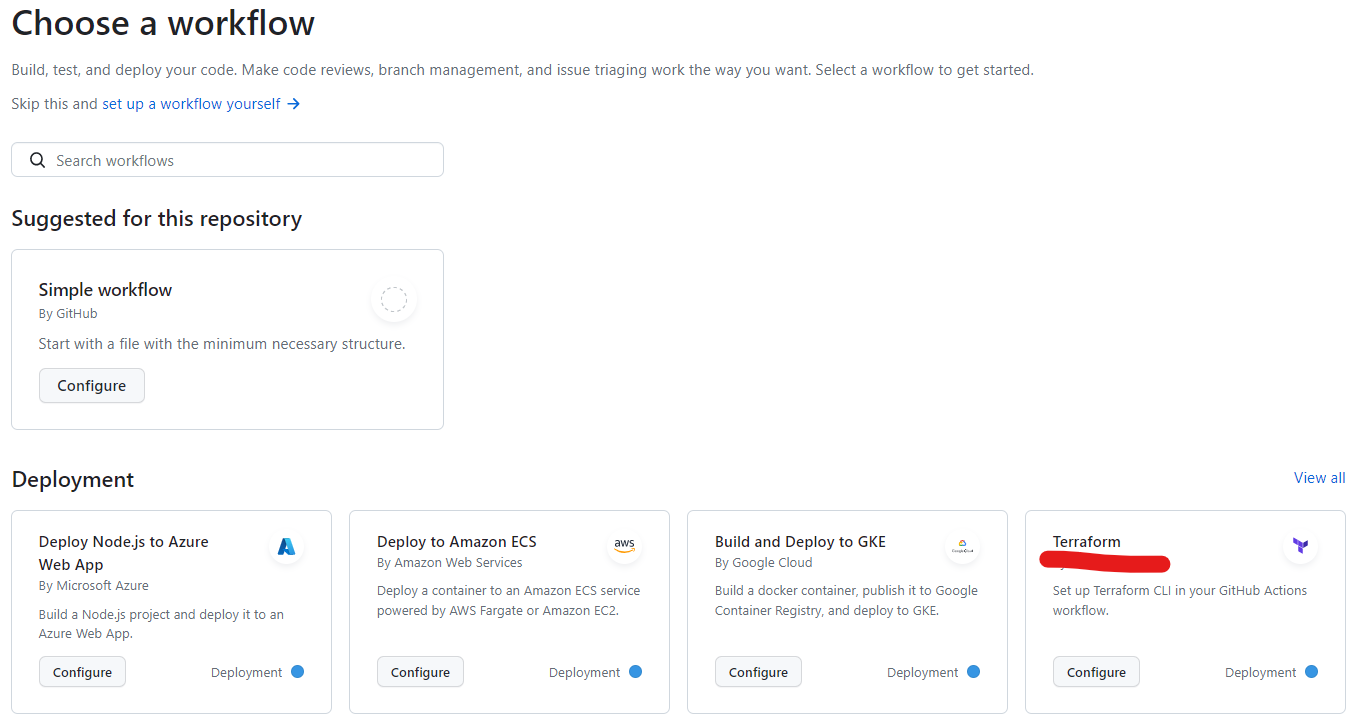
You can remove all the comments at the top as they are pretty much everything we have just gone through. The two things to change will be to add a workflow dispatch as an “on” trigger and also remove the quotes from “main” in the apply conditional branch. You can also remove all comments if you wish. Your file should now look something like the following, commit this to your remote repository.
name: "Terraform"

on:
  push:
    branches: ["main"]
  pull_request:
  workflow_dispatch:

permissions:
  contents: read

jobs:
  terraform:
    name: "Terraform"
    runs-on: ubuntu-latest
    environment: production

    defaults:
      run:
        shell: bash

    steps:
      - name: Checkout
        uses: actions/checkout@v3

      - name: Setup Terraform
        uses: hashicorp/setup-terraform@v1
        with:
          cli_config_credentials_token: ${{ secrets.TF_API_TOKEN }}

      - name: Terraform Init
        run: terraform init

      - name: Terraform Format
        run: terraform fmt -check

      - name: Terraform Plan
        run: terraform plan -input=false

      - name: Terraform Apply
        if: github.ref == 'refs/heads/main' && github.event_name == 'push'
        run: terraform apply -auto-approve -input=false
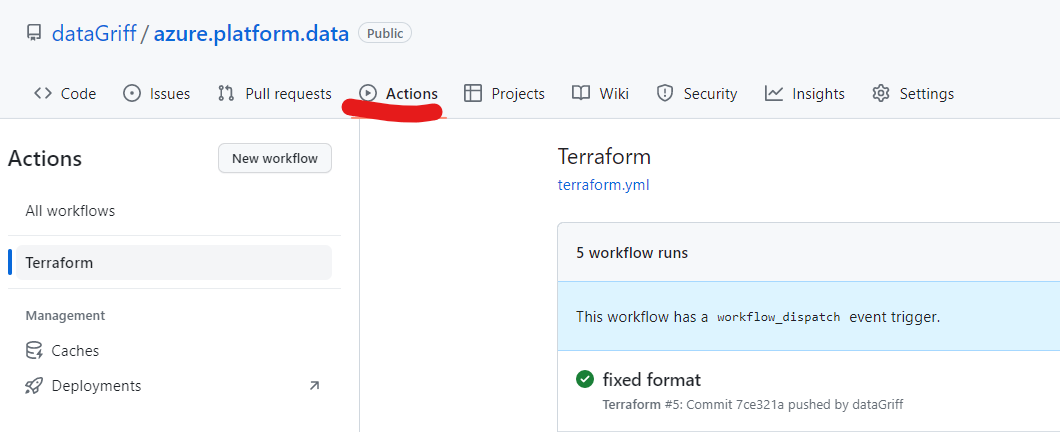
You should be able to do a manual run of this workflow because we added the workflow_dispatch trigger. Run your workflow and make sure it all goes green!
Deploy Azure Data Platform Assets
Now we have everything configured I want to add some data platform resources to my terraform code. Before I do this I need to update my variables file to name these appropriately. Amend your variables.tf code to be the following which now has extra variables at the end to handle the new resource names (databricks, data lake and event hub).
variable "region" {
  type        = string
  default     = "northeurope"
  description = "The is the Azure region the resources will be deployed into."
  validation {
    condition     = contains(["northeurope", "westeurope"], var.region)
    error_message = "The region is not in the correct region."
  }
}

variable "environment" {
  type        = string
  default     = "learning"
  description = "The is the environment the resources belong to. e.g. learning, development, production."
  validation {
    condition     = contains(["learning", "development", "production"], var.environment)
    error_message = "The environment is not valid."
  }
}

variable "team" {
  type        = string
  default     = "datagriff"
  description = "The is the team that own the resources."
  validation {
    condition     = contains(["datagriff", "hungovercoders", "dogadopt"], var.team)
    error_message = "The team is not valid."
  }
}

variable "organisation" {
  type        = string
  default     = "datagriff"
  description = "The is the organisation that owns the resources."
  validation {
    condition     = contains(["datagriff", "hungovercoders", "dogadopt"], var.organisation)
    error_message = "The organisation is not valid."
  }
}

variable "domain" {
  type        = string
  default     = "data"
  description = "The is the business problem domain being solved by the resources."
}

variable "azure_namespace" {
  type        = string
  default     = "dgrf"
  description = "The is the unique namespace added to resources."
}

locals {
  region_shortcode          = (var.region == "northeurope" ? "eun" : var.region == "westeurope" ? "euw" : "unk")
  environment_shortcode     = (var.environment == "learning" ? "lrn" : var.environment == "development" ? "dev" : var.environment == "production" ? "prd" : "unk")
  resource_group_name       = "${local.environment_shortcode}-${var.domain}-rg"
  storage_account_name      = "${local.environment_shortcode}${var.domain}sa${local.region_shortcode}${var.azure_namespace}"
  eventhub_namespace_name   = "${local.environment_shortcode}-${var.team}-ehns-${local.region_shortcode}-${var.azure_namespace}"
  databricks_workspace_name = "${local.environment_shortcode}-${var.team}-dbw-${local.region_shortcode}-${var.azure_namespace}"
  tags = {
    environment = var.environment
    team        = var.team
    domain      = var.domain
  }
}
Next amend your main.tf file to have the following code, which now configures all the resources we currently want. You can see a lot of the variables are reused or inherited from the original resource group.
resource "azurerm_resource_group" "rg" {
  name     = local.resource_group_name
  location = var.region
  tags     = local.tags
}

resource "azurerm_databricks_workspace" "dbw" {
  name                = local.databricks_workspace_name
  resource_group_name = azurerm_resource_group.rg.name
  location            = azurerm_resource_group.rg.location
  sku                 = "standard"
  tags                = local.tags
}
resource "azurerm_storage_account" "sa" {
  name                     = local.storage_account_name
  resource_group_name      = azurerm_resource_group.rg.name
  location                 = azurerm_resource_group.rg.location
  account_tier             = "Standard"
  account_replication_type = "LRS"
  account_kind             = "StorageV2"
  is_hns_enabled           = "true"
  tags                     = local.tags
}

resource "azurerm_storage_data_lake_gen2_filesystem" "lake_container" {
  name               = "lake"
  storage_account_id = azurerm_storage_account.sa.id
}

resource "azurerm_storage_data_lake_gen2_filesystem" "events_container" {
  name               = "events"
  storage_account_id = azurerm_storage_account.sa.id
}

resource "azurerm_eventhub_namespace" "ehns" {
  name                = local.eventhub_namespace_name
  location            = azurerm_resource_group.rg.location
  resource_group_name = azurerm_resource_group.rg.name
  sku                 = "Standard"
  capacity            = 1
  tags                = local.tags
}
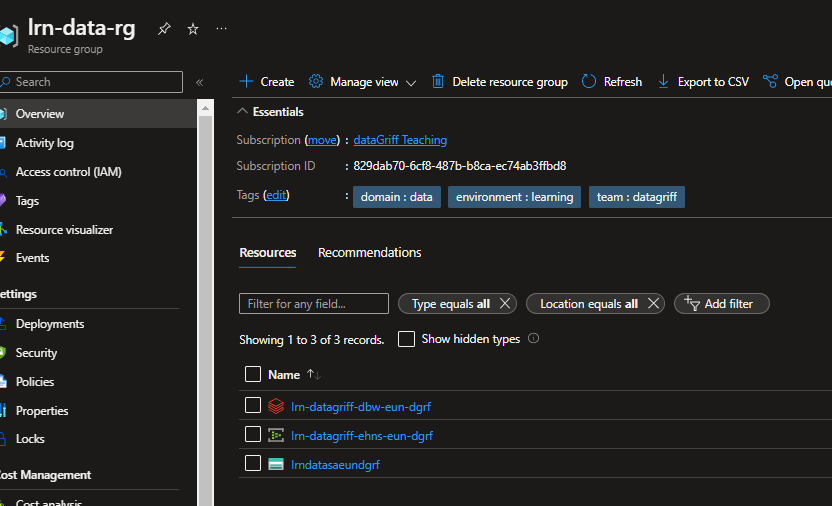
Check in your source code and the github actions should kick off automatically. At the end of this you should then find your resource group now has some basic azure data platform assets for you to use whenever you need to do some learning!
These resources don’t tend to cost anything when they don’t have clusters or hubs on them so they’re fine to leave… but I would recommend a regular tear down in case you have added compute to them. You can then easily create them again using this system you have now setup. To kill your assets when you are not using them you can then run terraform destroy from your IDE when logged in or run destroy from your terraform cloud workspace.
To see the most up to date version of this code see my repository at dataGriff/platform.azure.data, or in case I renamed it drunkenly check out datagriff github!