
Cookie Consent for your Website Using Google Tag Manager
Ok beer and code lovers, I wanted to make sure that I captured consent for analytics for anyone coming to the hungovercoders website. I’ll be honest by the end of my consent rabbit hole I really fancied a can, but instead I’ll share my knowledge here with you of how I leveraged Google Tag Manager and Klaro to manage consent for a website. The reason that this is such a great combination is that it is free, extremely customizable and you can manage your consent from a single point.
- Prerequisites
- Enable Google Tag Manager Consent Overview
- Capture User Consent with Klaro
- Create User Defined Vairables to Hold Each Consent
- Configure GTM Consent
- Create Consent Test Tags
- Categorise Consent Objects in a Folder
- Preview and Walkthrough the Work
- Submit and Test Site
Prerequisites
Tools
This consent mechanism is using Google Tag Manager so you will need this with a container running on your website. In order to have the cookie consent mechanism on any entry point of your website, you’ll need to make sure GTM is installed on every page, and every page going forward.
You’ll also need a privacy or terms and condition page for your website in order to direct any questions around consent towards this. The consent modal box we build will direct users to this if they have any queries.
I also recommend installing the extension edit this cookie as it makes it easier to specifically manipulate your cookies without having to go into the developer console when testing.
Reading Material and Sources
I did my background learning and stealing from far more learned people than me. Please see Muhammad Ali’s blog for a great simple cookie consent explanation, who then put me on to klaro as an open source consent tool. I then discovered this great video tutorial by measureschool backed up by this blog post. It’s also worth reading through google tag manager consent configuration. However I will be summarising all of this into my our own brand of hungovercoder implementation below…
Enable Google Tag Manager Consent Overview
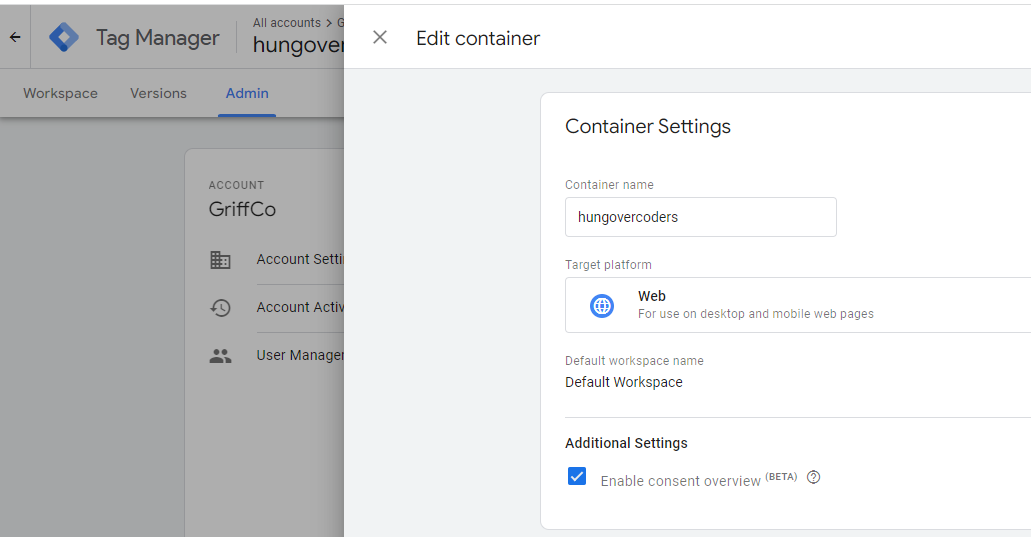
First of all enable google tag manager consent overview in Google Tag Manager. This is by far the best place to start as it immediately gives you an overarching view of the variables that apply consent on each of your tags. You will also see that there a number of built-in consent parameters for tags like GA4 configuration for analytics and advertising. Understanding the names of these variables up-front will help us map our klaro consent to the consent mechanism out of the box from GTM. To further understand the impact of these built-in variables to google analytics, please see the documentation here.
To enable consent overview, in google tag manager go to Admin > Container Settings and then tick Enable Consent overview.
Navigate back to your tags and click the shield icon, this will show all the consent parameters for each tag you currently have. You can see that there are automatic built-in ones you can leverage and you also have the ability to add your own.
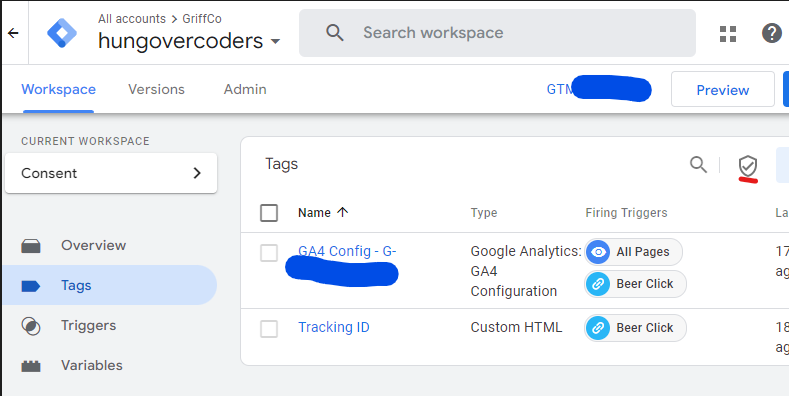
By seeing the built in ones for GA4 we know for example the simple consent we need to capture in order to fairly utilise GA4 analytics with respect to our website users consent.
We are therefore interested in out website user being able to set an analytics (analytics_storage) and advertising (ads_storage) consent mechanism based in the built-in consent flags. We will therefore use this as a guide in our implementation.
Capture User Consent with Klaro
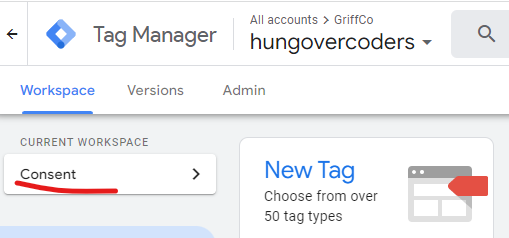
First create a new workspace in your Google Tag Manager called “consent” so we can do all the work in this isolated workspace from the off. When everything is working we can then preview this to test it and submit to our website.
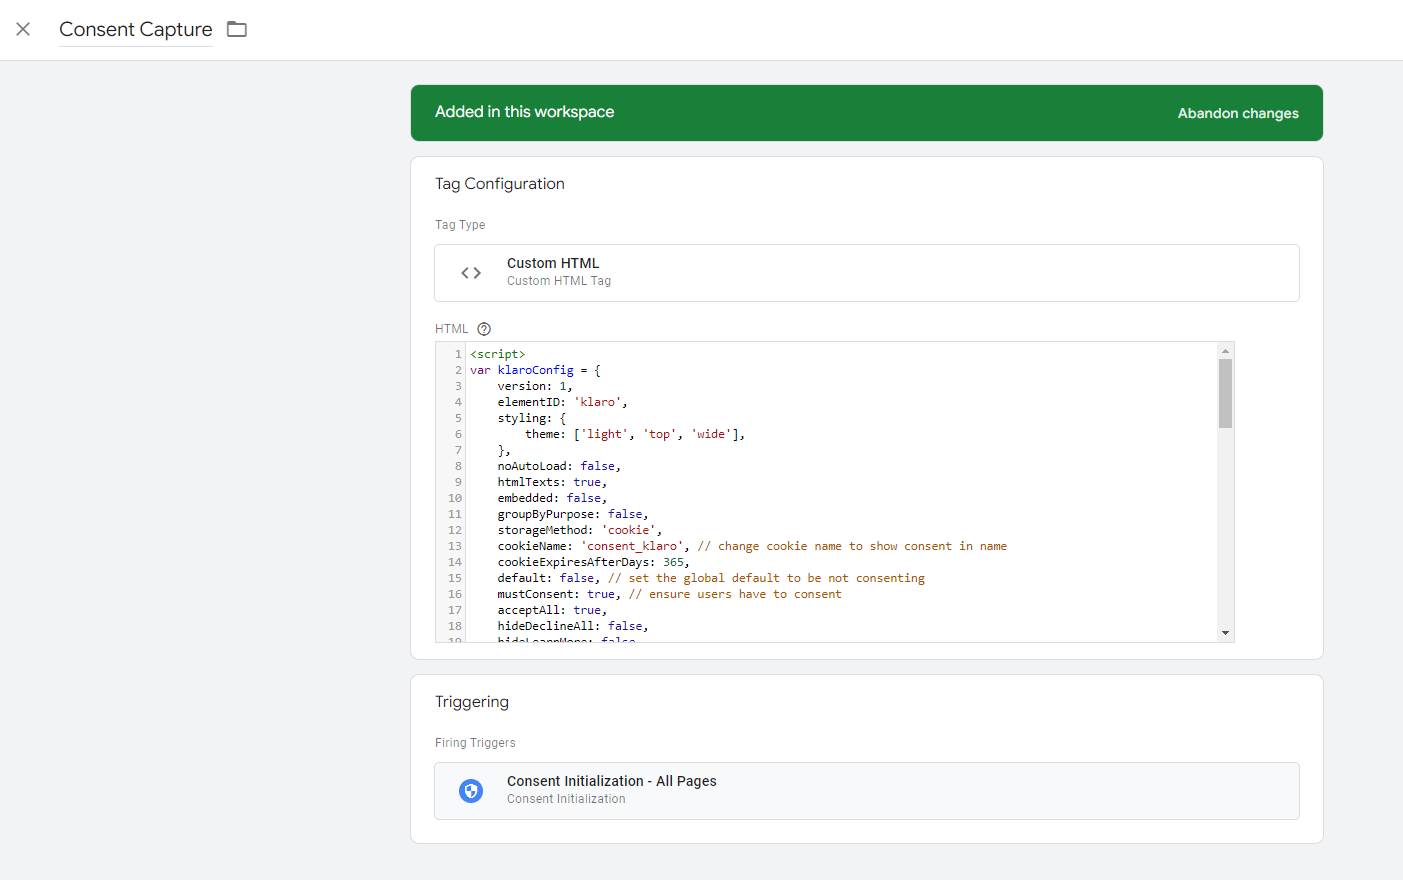
Next create a new tag called “Consent Capture” that uses Custom HTML. It is here we will place our open source klaro code to capture consent. I basically took this example config.js from the github, shortened it into the code below and added the initiation script for klaro for our use specific case to map to the built-in GTM consent we require.
Copy the code below and paste it into your tag to follow exactly what I have done, or take a look at the config to understand more the options you would like to apply. Comments in the code show the changes I made.
<script>
var klaroConfig = {
    version: 1,
    elementID: 'klaro',
    styling: {
        theme: ['light', 'top', 'wide'],
    },
    noAutoLoad: false,
    htmlTexts: true,
    embedded: false,
    groupByPurpose: false,
    storageMethod: 'cookie',
    cookieName: 'consent', // change cookie name to show consent in name
    cookieExpiresAfterDays: 365,
    default: false, // set the global default to be not consenting
    mustConsent: true, // ensure users have to consent when enter website
    acceptAll: true,
    hideDeclineAll: false,
    hideLearnMore: false,
    noticeAsModal: false,
    translations: {
        zz: {
            privacyPolicyUrl: '/privacy.html', // link to privacy page
        },
        en: {
            consentModal: {
                title: '<u>Cookie Consent</u>', // Modal box heading
                description:
                    'Here you can see and customize the information that we collect about you.', // Modal box text
            },
            analytics: {
                description: 'Collecting of visitor statistics to understand site traffic and user behaviour without being utilised for marketing',
            },
           marketing: {
                description: 'Marketing to users of the website based on the information collected',
            },
            purposes: {
                analytics: 'Analytics',
                marketing: 'Marketing',
            },
        },
    },
    services: [
        {
            name: 'analytics', // this will eventually map to analytics_storage in GTM
            title: 'Analytics',
            default: true, // set to true and hope users nice
            purposes: ['analytics'],
        },
        {
            name: 'marketing',  // this will eventually map to ads_storage in GTM
            title: 'Marketing',
            default: false, // set to false and hope users realise being nice
            purposes: ['marketing'],
        },
    ],
};
</script>
<script defer type="text/javascript" src="https://cdn.kiprotect.com/klaro/v0.7.11/klaro.js"></script>
Add a trigger to your tag for “Consent Initialization - All Pages”. Your “Consent Capture” tag should now look something like the following.
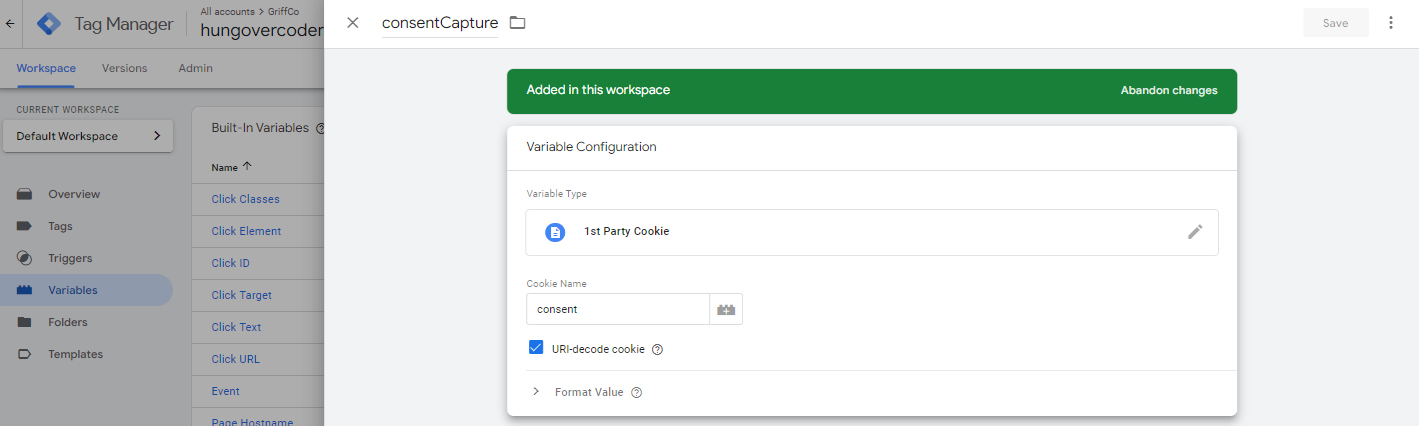
Create First Party Cookie Variable
Now create a first party cookie variable to capture the consent details captured in the cookie in the previous section. We can then leverage this as a cookie and parse it into other variables. To do this go to variables > create new > first party cookie. Set the variable name to be “consentCapture” and set the cookie name to be what you set in your claro config, in this case “consent”, finally set it to be a URI-decode cookie with a tick box.
Preview
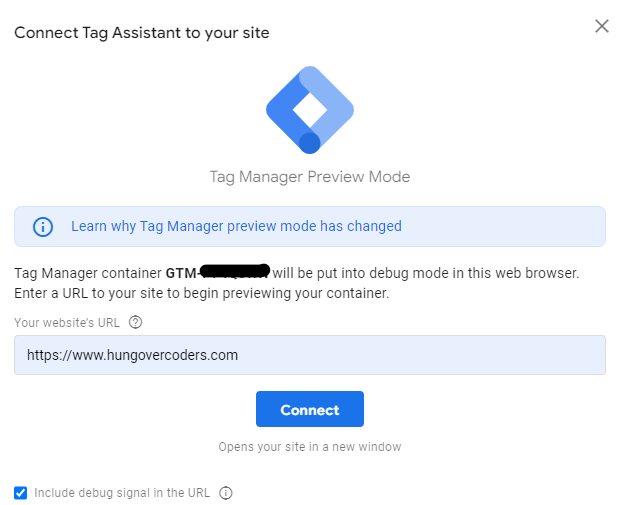
To see the new functionality in action go to “Preview” in google tag manager and connect to your website.
If you for example decline marketing but leave analytics as it is, you can see the first party cookie variable set correctly in tag assistant.
Remember this just sets a cookie at this point, it does not map of the any consent values to the behaviour in GTM where we capture data for different use cases, so we need to do this in the next section.
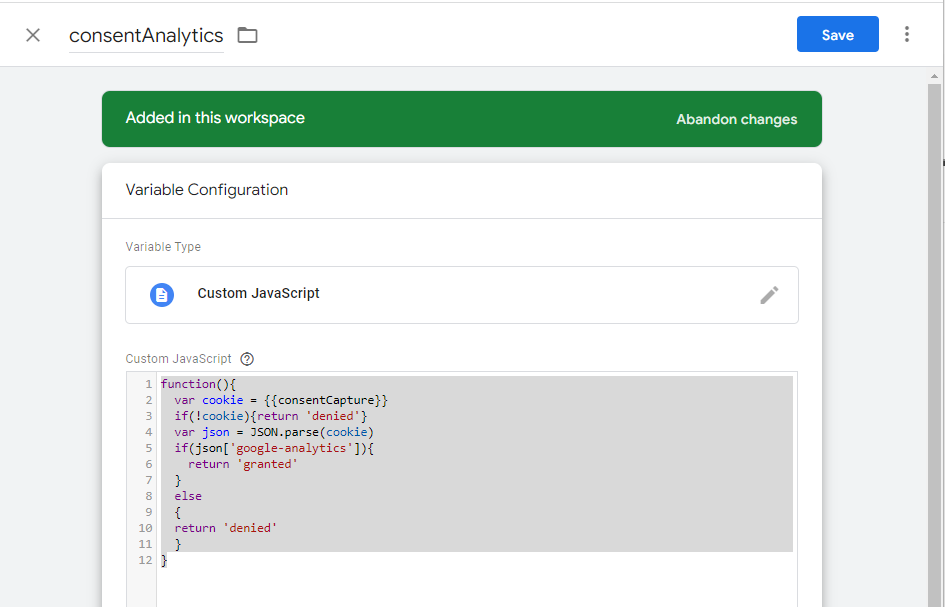
Create User Defined Vairables to Hold Each Consent
Create a new User-Defined variable called “consentAnalytics”. This will hold the conent captured from the klaro consent object above. Set the variable to custom javascript and paste in the code below.
function(){
  var cookie =
  if(!cookie){return 'denied'}
  var json = JSON.parse(cookie)
  if(json['analytics']){
    return 'granted'
  }
  else
  {
  return 'denied'
  }
}
Your variable should look like the below.
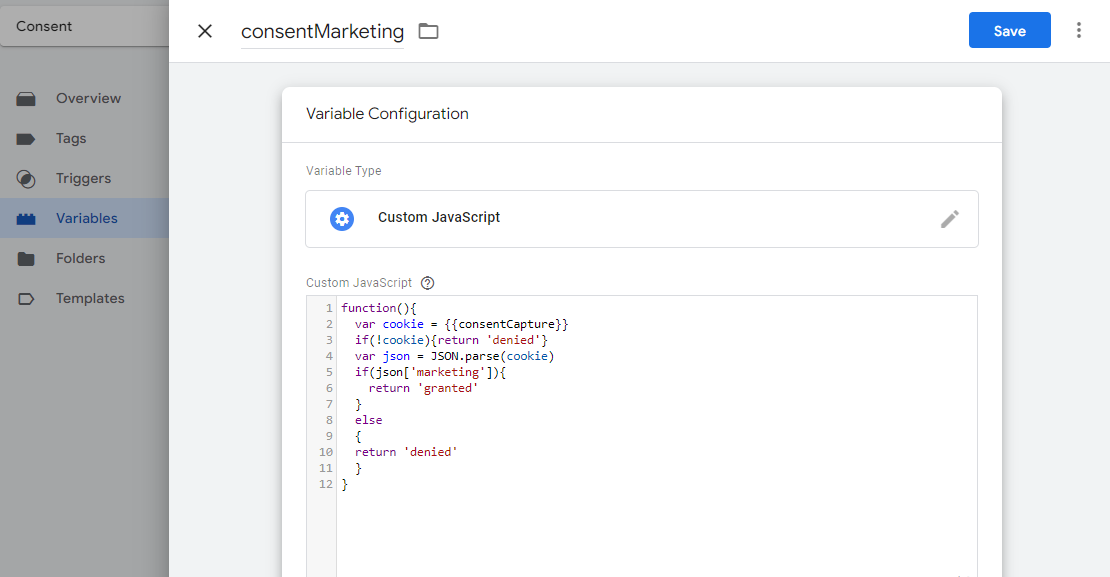
Create a new User-Defined variable called “consentMarketing. This will hold the consent captured from the klaro consent object above. Set the variable to custom javascript and paste in the code below.
function(){
  var cookie =
  if(!cookie){return 'denied'}
  var json = JSON.parse(cookie)
  if(json['marketing']){
    return 'granted'
  }
  else
  {
  return 'denied'
  }
}
Your variable should look like the below.
Configure GTM Consent
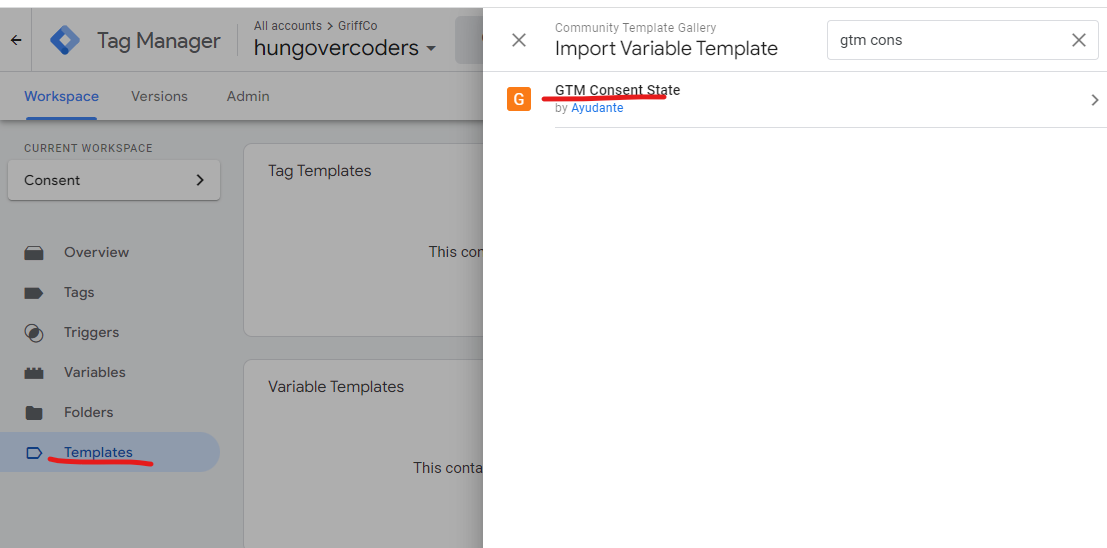
Use GTM Consent State Template Variable
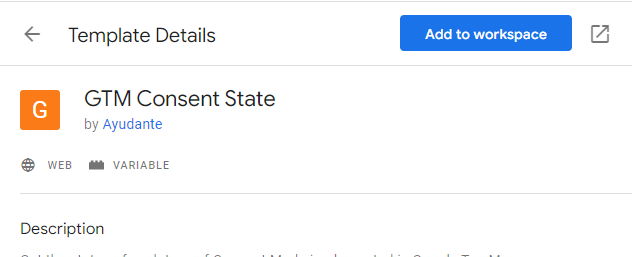
We now want to add a variable that GTM can use to map to the global GTM consent mode we saw in the first section of this blog post. Luckily someone has made this for us as a template so we can go to templates, variable templates and add the GTM consent state.
Add this to your workspace and accept the fact its a third party.
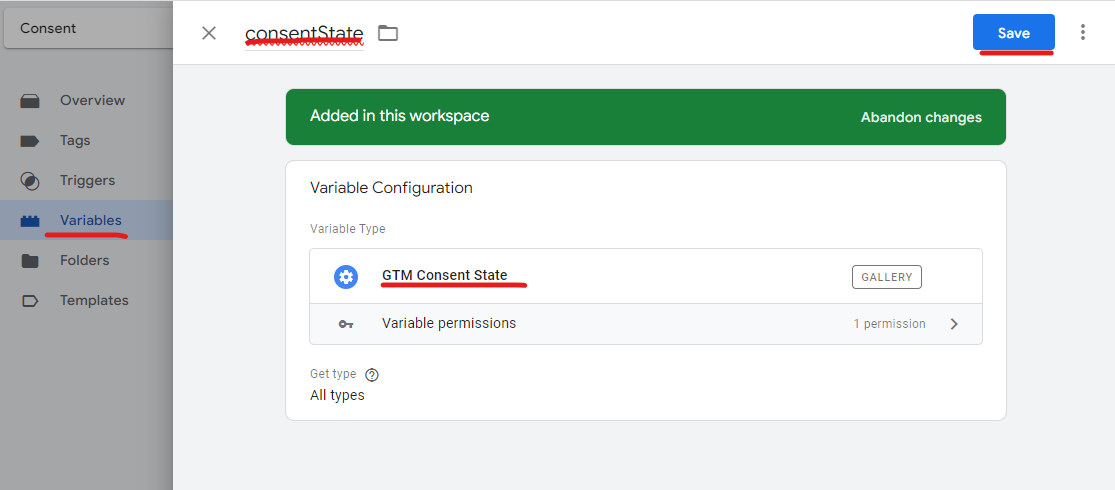
Go to variables and add a new user defined variable called “consentState”, which is the template you just added.
In the next section we’ll ensure that our klaro consent is mapped to this variable so that GTM consent can pick up the values.
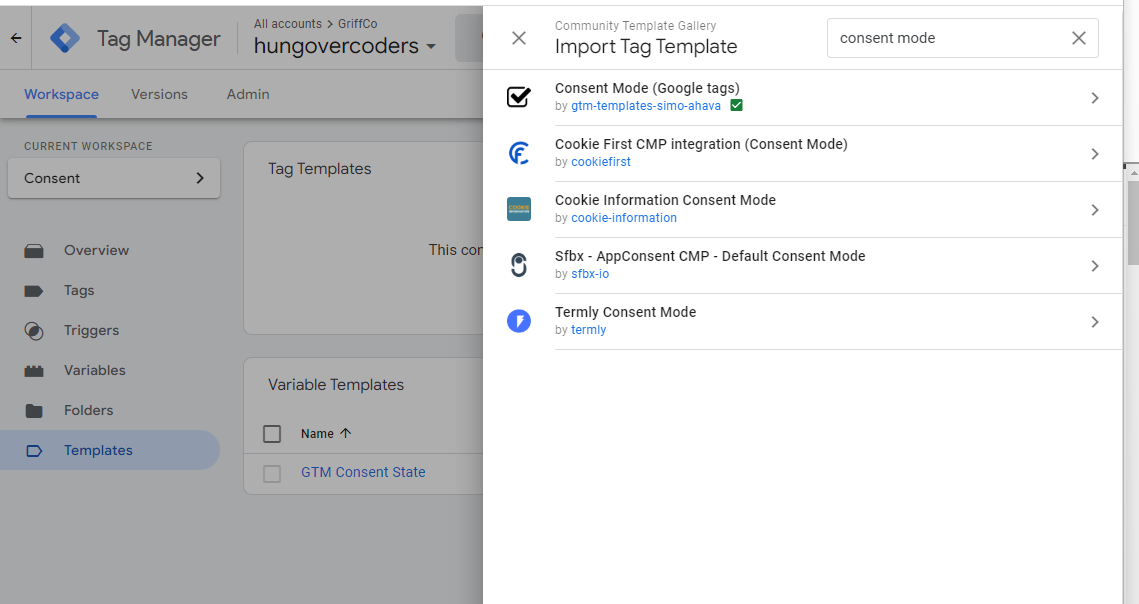
Use GTM Consent Mode Template Tag
Luckily we have another template we can use, this time a tag. Go to templates and search in the tag templates for “Consent Mode” and add the one shown below.
Add this to your workspace and accept the fact its a third party.
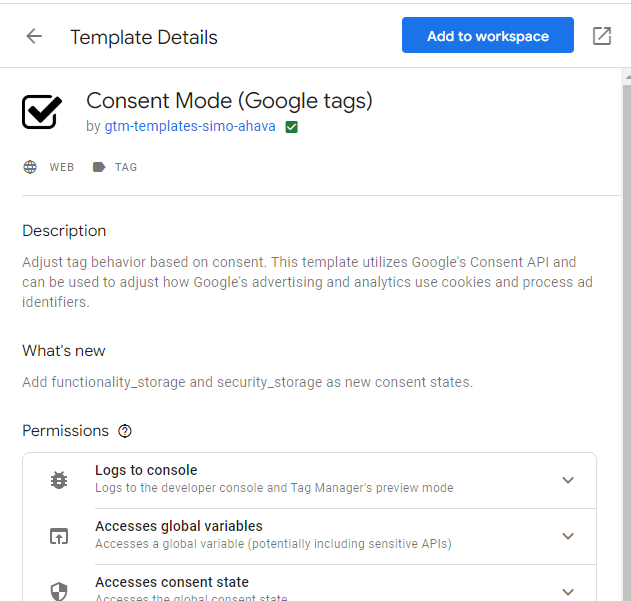
Go to Tags and add this new template as a tag called “Consent Mode”. Set the Consent Command to be “Update”, then configure the rest as below. Note that advertising and analytics are using our new variables that take their value originally from the klaro consent cookie. We just set everything else to be denied for now as we are not using them.

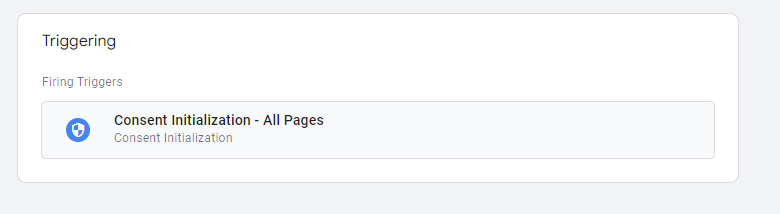
Add a trigger to this tag so that it fires on “Consent Initialization - All Pages”.
Create Consent Test Tags
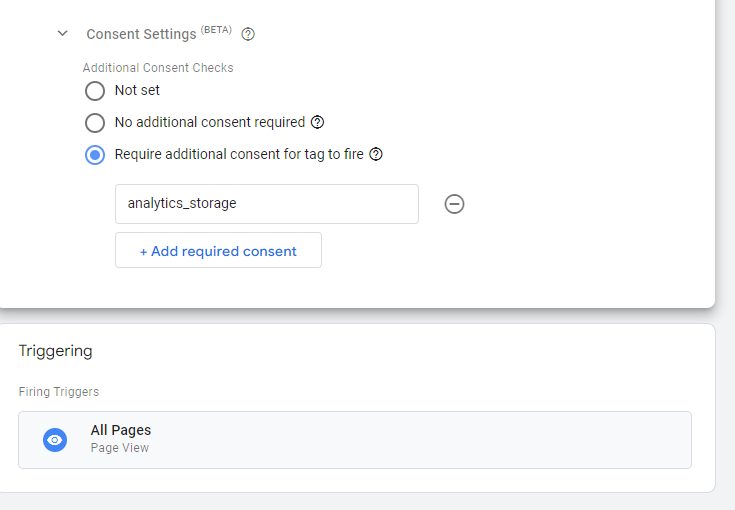
In order to make sure the consent for marketing and analytics is working correctly I added two test tags for every page. First add a new tag called “Consent Test Analytics”. Use custom HTML and add the script below which will log the tag firing to the console.
<script>console.log("Consent Test Analytics Tag Fired")</script>
Your tag should look like this.

Under advanced settings in the tag, for consent settings set the “Require additional consent for tag to fire” to be “analytics_storage”. This will be picked up from the GTM consent mode we have added. Have this tag trigger on every page so we can monitor it.
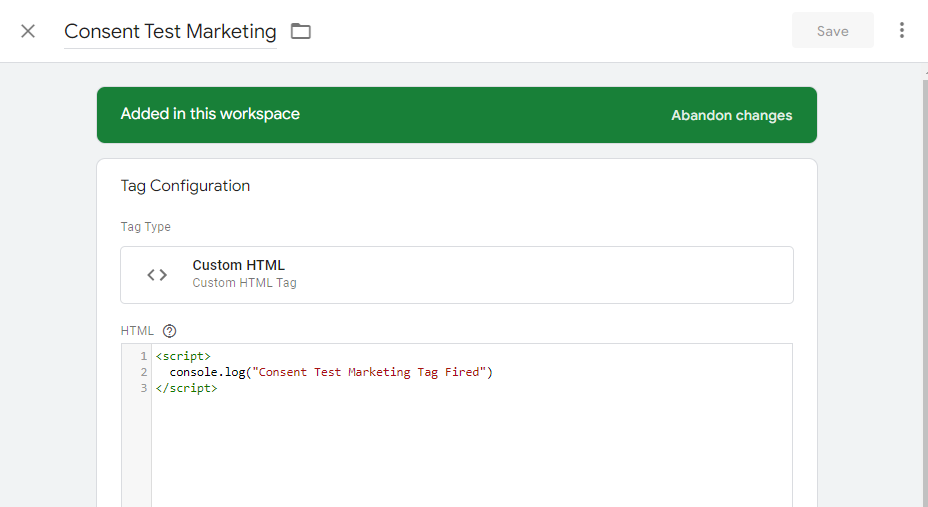
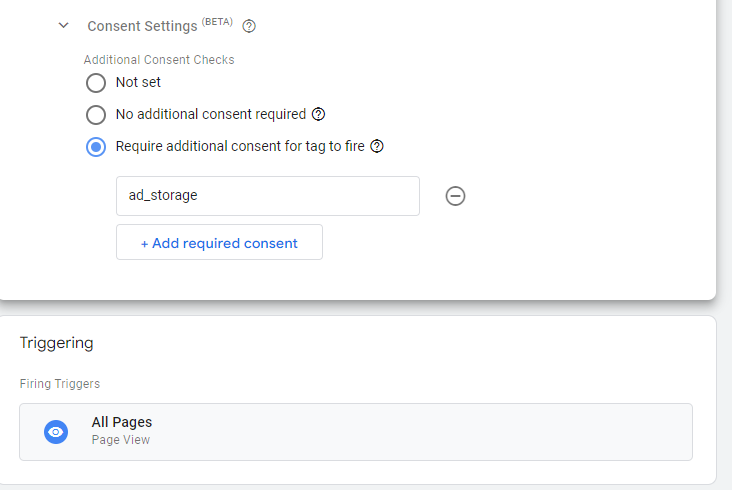
Secondly add a new tag called “Consent Test Marketing”. Use custom HTML and add the script below which will log the tag firing to the console.
<script>console.log("Consent Test Marketing Tag Fired")</script>
Your tag should look like this.
Under advanced settings in the tag, for consent settings set the “Require additional consent for tag to fire” to be “ads_storage”. This will be picked up from the GTM consent mode we have added. Have this tag trigger on every page so we can monitor it.
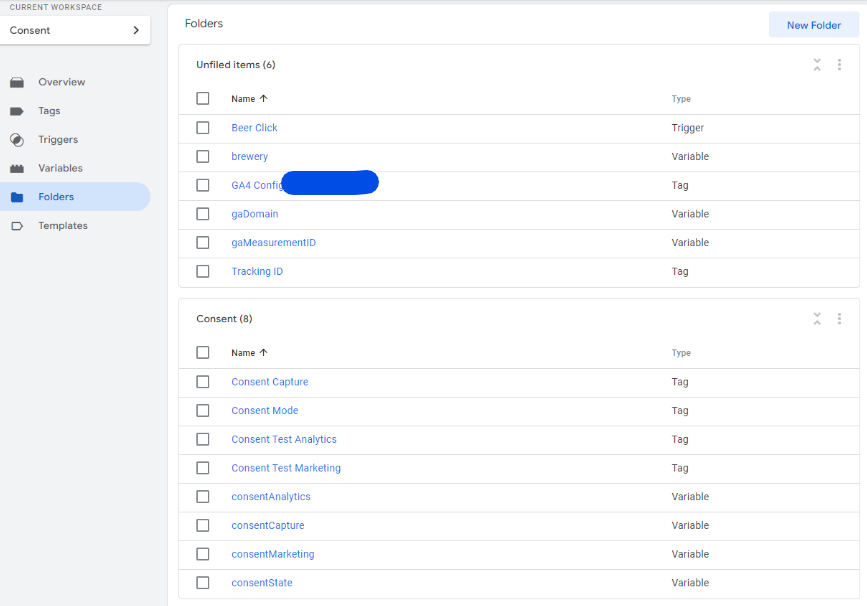
Categorise Consent Objects in a Folder
This is an optional step but you can collect all your consent related objects into a folder so its easier to recognise them. I feel I will need to explore this further…
Preview and Walkthrough the Work
Navigate Preview Website
In the top right hand corner of your screen you should have 12 workspace changes (or 11 if you didn’t do the folder categorisation in the last step).
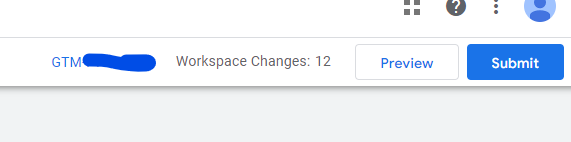
Click preview and connect to your website.
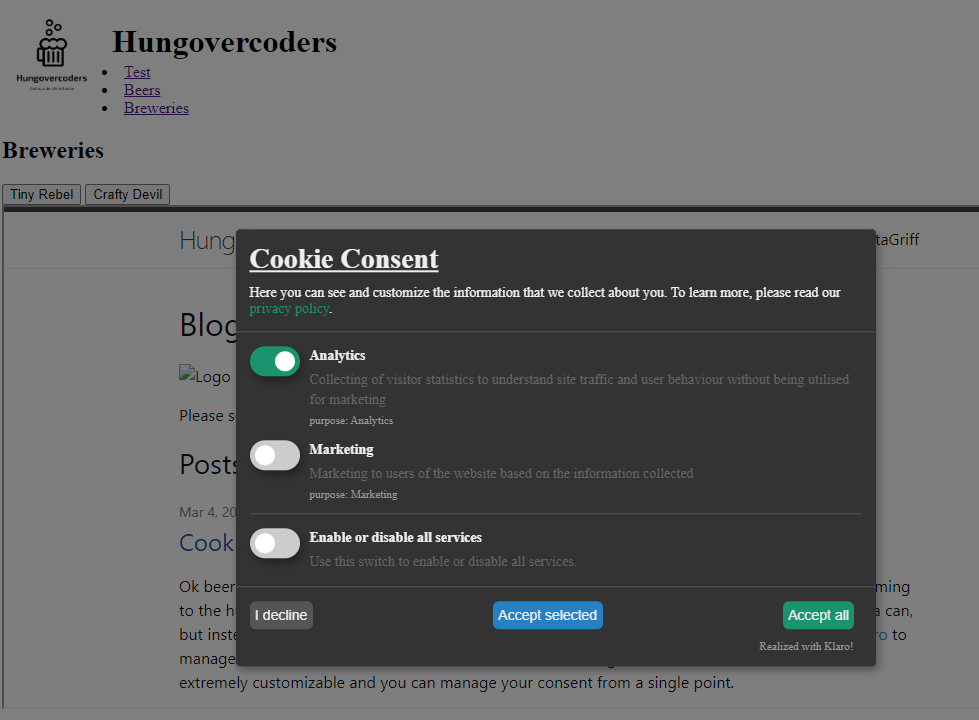
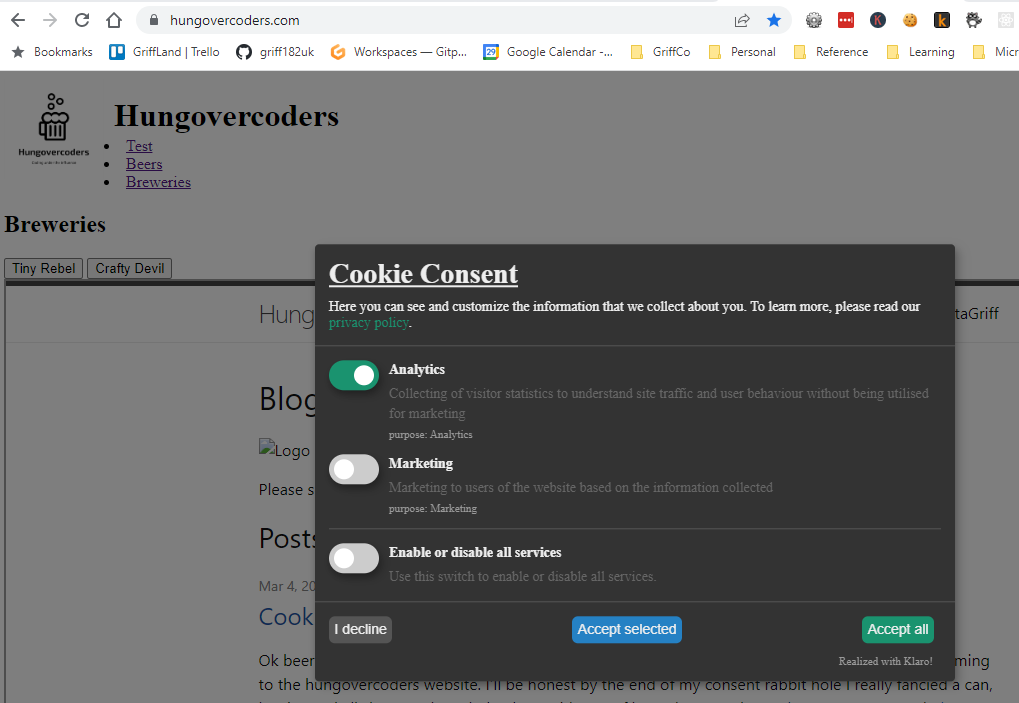
You should now find the cookie consent pop-up occurs with the “Analytics” and “Marketing” services we offered consent on.
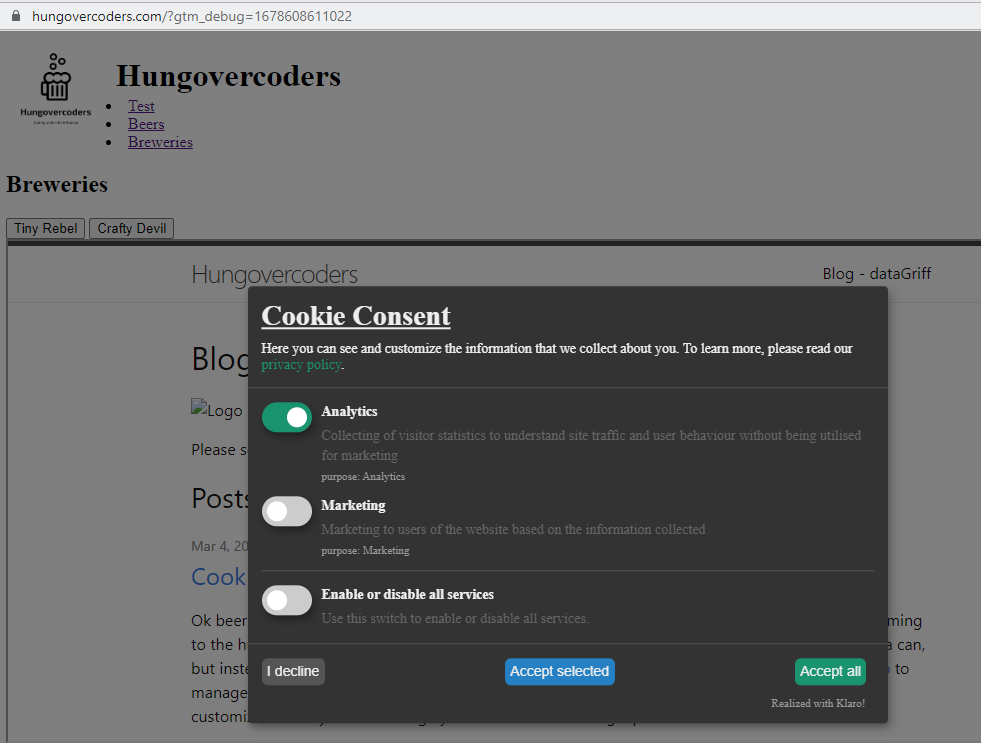
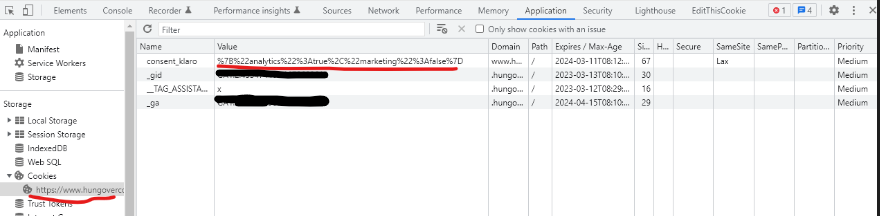
First if we check our cookies, either developer tools or “edit this cookie”, you will see that the consent_klaro cookie is behaving as expected with analytics set to true and marketing set to false.
Navigate to some other pages now of the website and you will not be asked for cookie consent again. This is due to our settings in our klaro config we currently set them to last for 365 days. We can also use these page view events to confirm our test tags are firing or not appropriately using tag assistant.
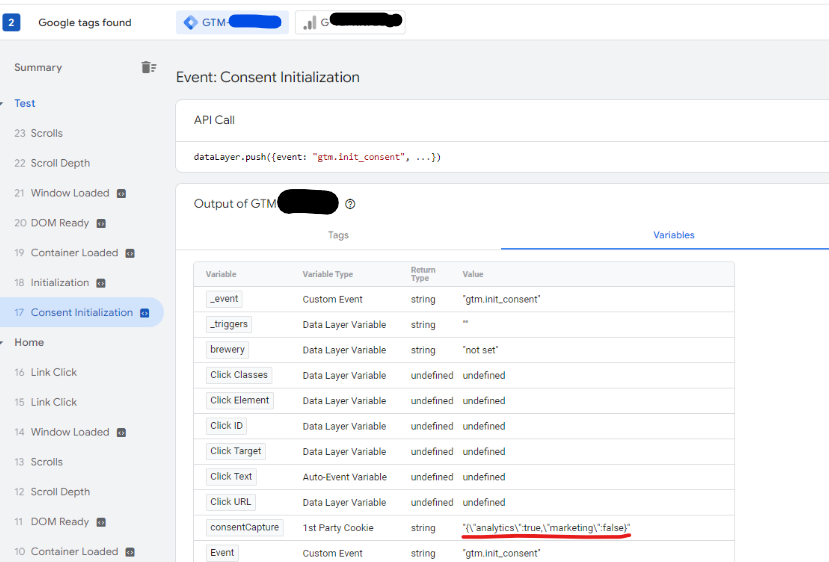
Tag Assistant Logs
If we now go into tag assistant and look through the different events you will see the triggers firing and the different states of the variables we have implemented. We can also see our test tags firing or not. There is a bit of chicken and egg going on with the consent capture as by default customers deny all on their first visit until they have completed the consent pop-up. This is why I set the mustConsent: true configuration in the klaro configuration to ensure we get this as early as possible so the customer can consent appropriately.
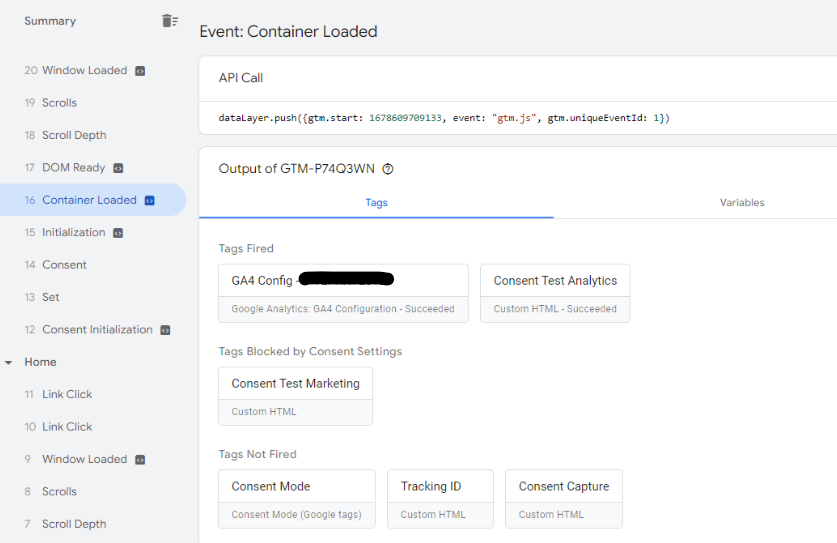
Let’s have a walkthrough of the events to explain this…
So on the home page for consent initialisation both the consent mode and the consent capture tags fire.
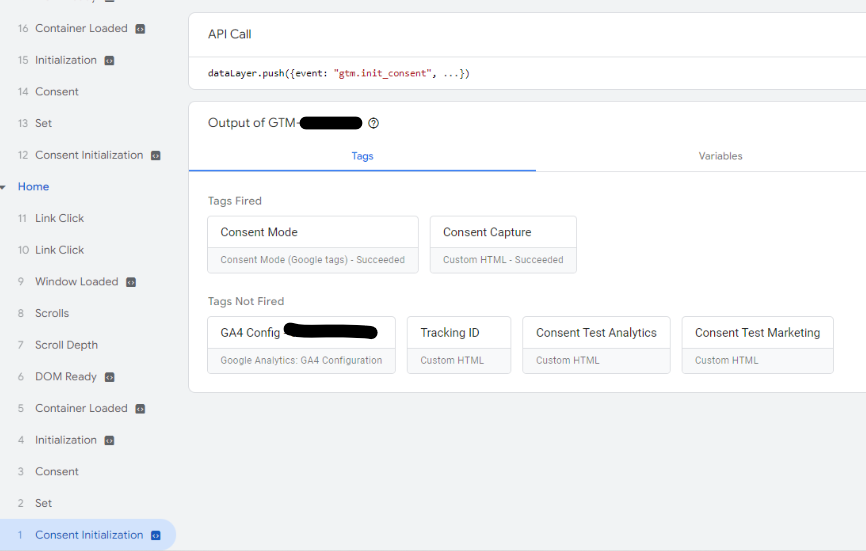
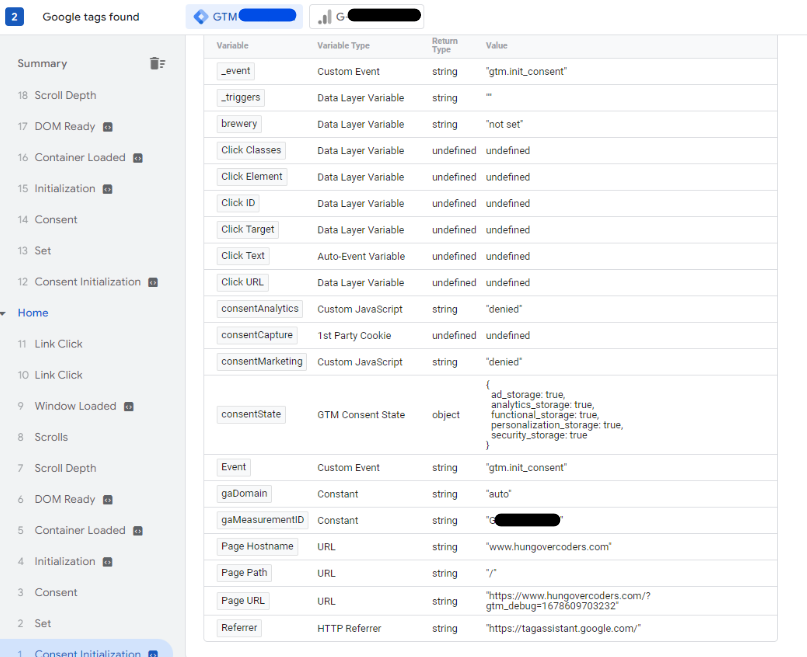
The variables at this point for GTM consent state are all true, but you can see that the “consentAnalytics” and “consentMarketing” variables that we use to apply our GTM consent mode are both “denied”. This is because the “consentCapture” cookie from the klaro consent modal box is still “undefined” so is yet to set these values.
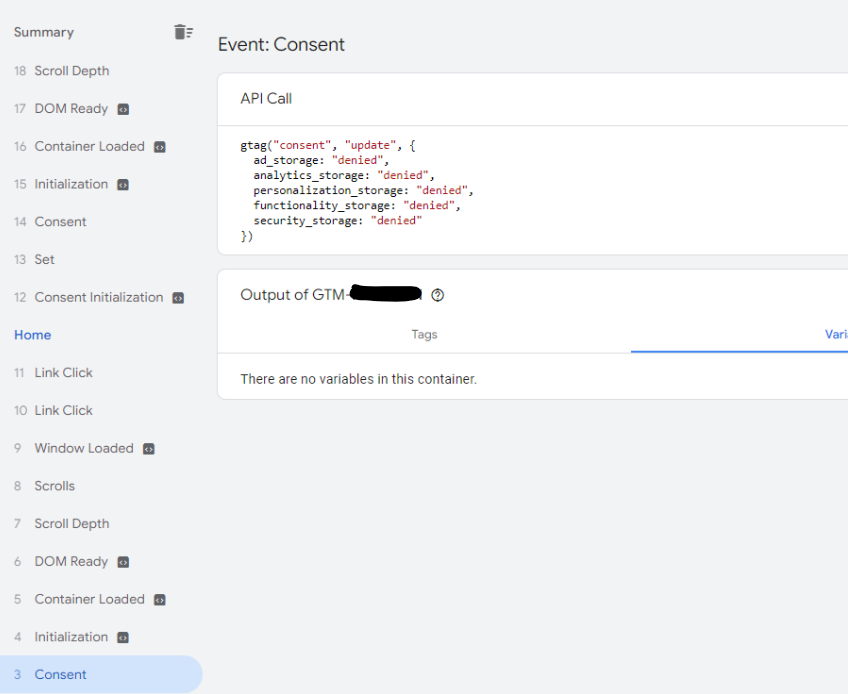
The next to events are set and consent. If you look at the “consent” call you will see that it is an API call that sets all the GTM consent modes to “denied”. These are the defaults we set and also the customer still has not set any preferences in the consent modal box.
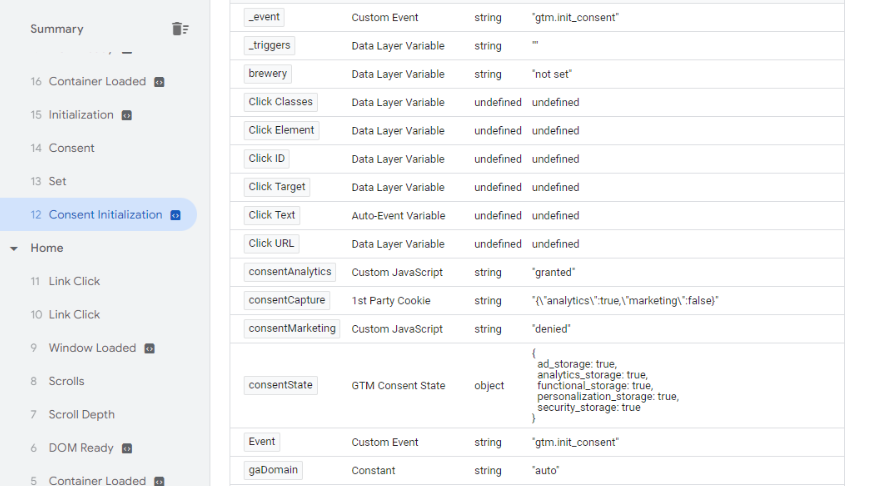
Now you as the customer at this point has been forced to set their preferences for consent. If you then look at the link click event which is the navigation to another page, you will see that the consentCapture variable has now been set, along with the appropriate individual “consentAnalytics” and “consentMarketing” variables.

However, the consentState object will not be set until another consent initialisation event occurs when opening the next page. It is here then you can see that the analytics_storage property is also set to true here as a result of the previous consent update.
If you look at the container loaded event for this page view you will also see that the “Consent Test Analytics” tag fired but the “Consent Test Marketing Tag” was blocked by Consent settings.
I recommend having a clear out of your cookies, either using developer console or edit this cookie, and make sure you understand the process and that everything is behaving as expected. Feel free to play around and tweak any of the configuration to make it suit your needs, but this should be a good base for you to start from now.
Submit and Test Site
Now that you’re happy the consent mechanisms are working as you expect, submit the GTM workspace and publish it to your production website…
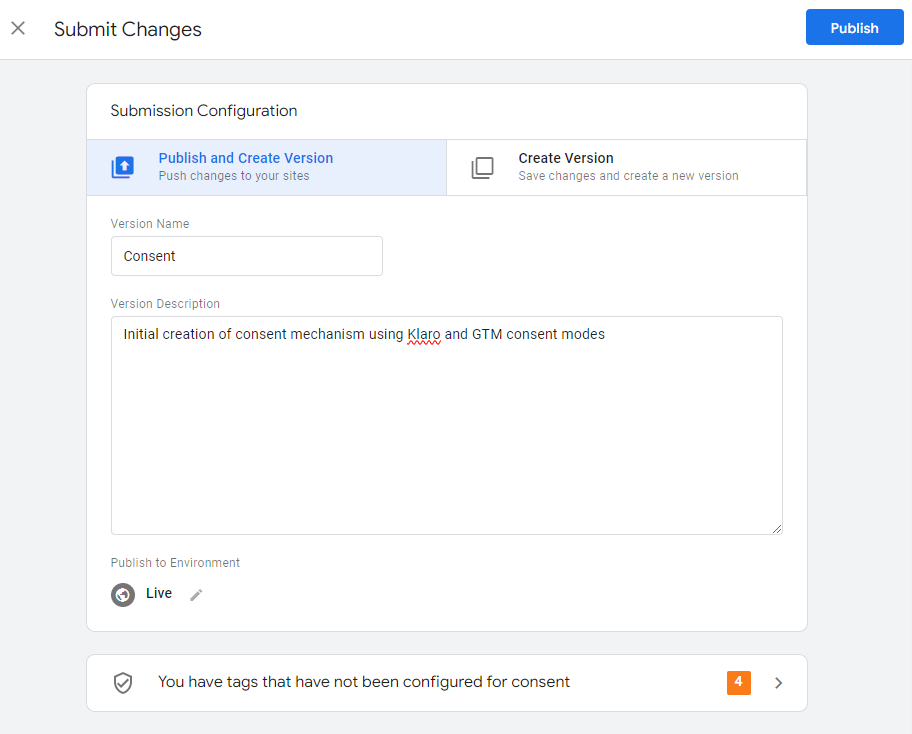
Wait! - Set Consent Explicitly in Tags
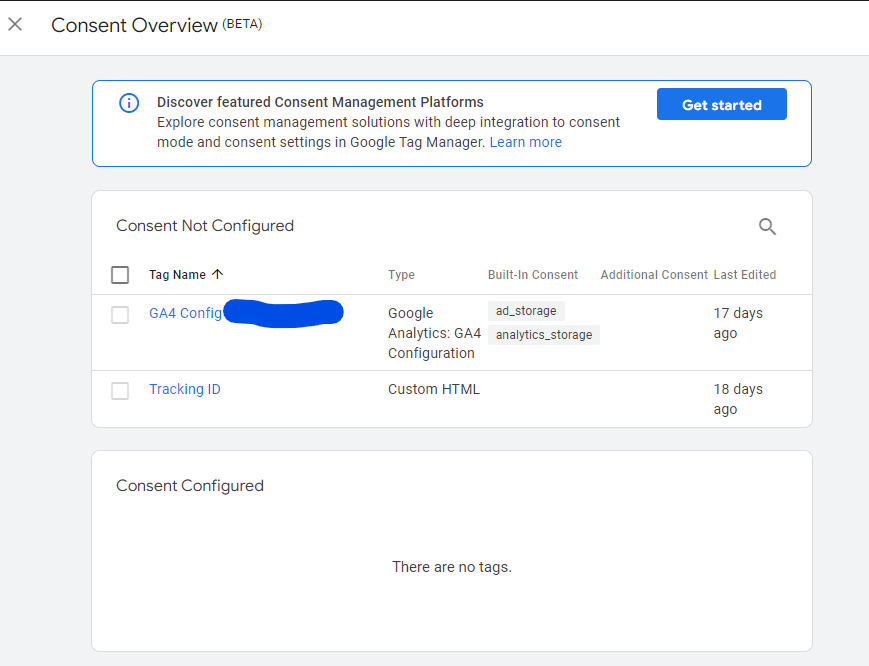
Hold on… you can also see that there is a warning with the shields saying “you have tags that have not been configured for consent”. This is referring to tags that have no additional consent configured. The built in consent mechanisms for GA4 will still work. However it is worth us getting consent-orientated from the start and setting this explicitly in our tags before publishing.

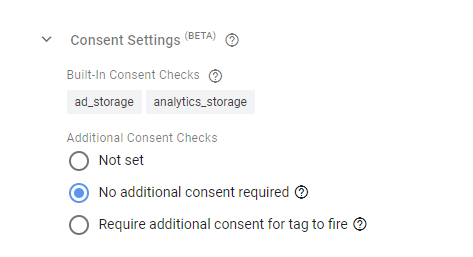
Go into each tag and under advanced settings set the appropriate consent required. For example for GA4 configuration the built-in consent is enough and we don’t need to add any more, so lets state that.
Publish with Consent Configured
Once you have done that with your tags, if you then go to publish you will see the warning removed and you’ll have a nice clean starting point to manage and observe consent.
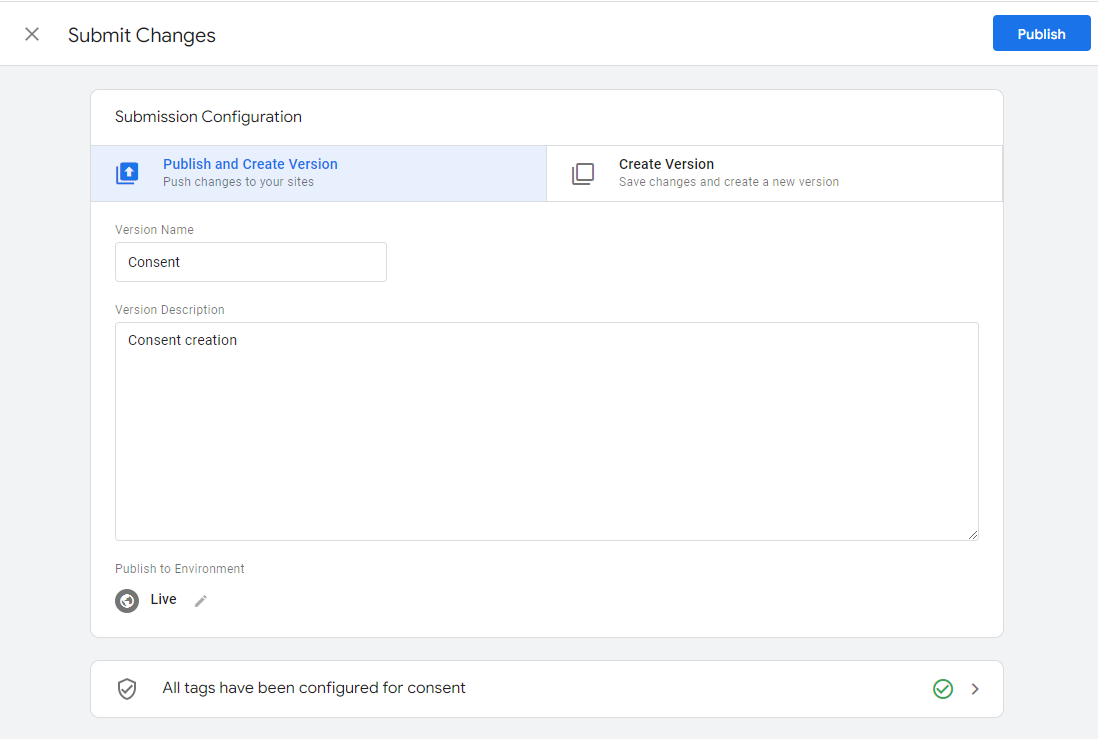
Now navigate to your website and confirm all is working as expected.
I think that’s worthy of a quick pint after all this work… I definitely consent!