
Docker Environment Variables and Secret Beers in Azure Key Vault
I have been looking at storing beers in a database and to do that I needed to understand how environment variables work. My alcohol-addled mind needed to hello world this before I got state involved as well. Below is a simple demonstration of how you deal with environment variables in a docker fast api setup and then how you can reference these in a deployed app with key vault in Azure.
- PreRequisites
- Directory Structure
- Setup Basic FastAPI Application Locally with Environment Variables
- Run App in Docker with Environment Variables
- Create Azure Webapp with Docker Image and Variables
- Add Key Vault Secrets to Azure Webapp Variables
PreRequisites
- You”ll need a decent IDE - I use visual studio code.
- You’ll need docker desktop installed and a docker account.
- You’ll need latest version of python installed.
- You’ll need an Azure account.
Directory Structure
The end directory structure for the demo will look as follows:
docker-env
│   README.md
|   .gitignore
|   Dockerfile
|   Requirements.txt
└───app
│   │   main.py
We will also have two local files to control the python environment and environment variables, these will be in an .venv directory and .env file respectively.
To ensure these are obfuscated from source control, update your .gitignore file to look like the following:
.venv/*
.env
Setup Basic FastAPI Application Locally with Environment Variables
First of all add the requirements.txt file and add the following libraries for our basic FastAPI application with environment variables.
fastapi
uvicorn
python-dotenv
Then create your local python environment, activate it and install the required libraries by running:
python -m venv .venv
.venv\scripts\activate
pip install -r requirements.txt
In the main.py file add the following code for a basic hello world fast api:
from fastapi import FastAPI
app = FastAPI()
var1 ="blank1"
var2 ="blank2"
@app.get("/")
async def root():
"""Welcomes to beer environment api testing!
Returns:
string: Welcome message
"""
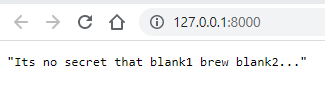
return f"Its no secret that {var1} brew {var2}.."
The run the fastapi using uvicorn server:
uvicorn app.main:app --reload
And you should see your api running with blank1 and blank2 as the variable values.
Now add a .env file in the root directory and add the following values:
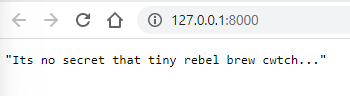
MY_SECRET_VARIABLE1=tiny rebel
MY_SECRET_VARIABLE2=cwtch
In your main.py application file add an import os to your python file and add the code to get the variables from this environment file instead of being hardcoded.
import os
from fastapi import FastAPI

app = FastAPI()

var1 =os.getenv("MY_SECRET_VARIABLE1")
var2 =os.getenv("MY_SECRET_VARIABLE2")

...
Run the application again with the environment file as an extra parameter…
uvicorn app.main:app --reload --env-file .env
… and you should see the environment variables presented in the API!
Run App in Docker with Environment Variables
We have proved the app can now take in environment variables, so lets build it with docker and ensure we can pass them in there when we run it too.
First add a Dockerfile to your root directory with the following for your FastAPI application:
FROM python:3.9

WORKDIR /code

COPY ./requirements.txt /code/requirements.txt

RUN pip install --no-cache-dir --upgrade -r /code/requirements.txt

COPY ./app /code/app

CMD ["uvicorn", "app.main:app", "--host", "0.0.0.0", "--port", "80"]
This will use python, copy your requirements files and install them, then copy your application code and start it on the uvicorn server.
Run docker build to create an image based on this file:
docker build -t env-demo .
Then run docker with the environment variables passed in…
docker run -d --env-file .env --name env-demo -p 80:80 env-demo
You should see on your local host now that the FastAPI application is running and the environment variables are present…
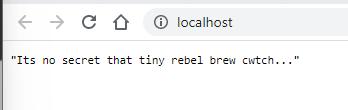
Success! We have proved we can pass in environment variables locally to Docker. Now lets get it up to Docker hub so we can make it available in an Azure application.
Run the following commands:
docker login -u {dockername}
docker tag env-demo {dockername}/env-demo
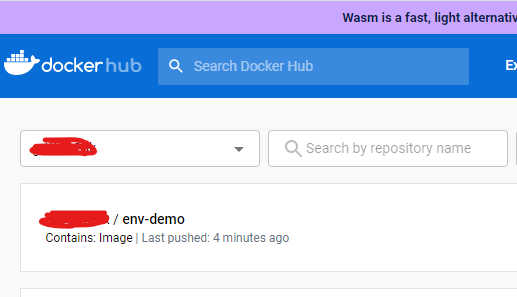
docker push {dockername}/env-demo
You should then see the image in your docker hub account available to pull from remote locations such as Azure.
Create Azure Webapp with Docker Image and Variables
We are now going to login to azure, create a resource group, an app service plan and a web app using our docker environment demo container as a source. To do this run the following code either in the Azure portal CLI or from VS code, be sure to update your uniquenamespace value to something unique to you (Azure resources need to be globally unique) and add your dockername.
az login
az group create --name dv-envdemo-rg --location northeurope
az appservice plan create -n dv-envdemo-apl-eun-{uniquenamespace} -g dv-envdemo-rg --is-linux
az webapp create --resource-group dv-envdemo-rg --plan dv-envdemo-apl-eun-{uniquenamespace}  --name dv-envdemo-app-eun-{uniquenamespace} --deployment-container-image-name registry.hub.docker.com/{dockername}/env-demo:latest
If you accidentally enter the wrong image name for the container (as I drunkenly did the first time), run the following to reset your webapp to the correct image.
az webapp config container set --name dv-envdemo-app-eun-{uniquenamespace} --resource-group dv-envdemo-rg --docker-custom-image-name registry.hub.docker.com/{dockername}/env-demo:latest
Now if you navigate the url of your WebApp you should see the following:

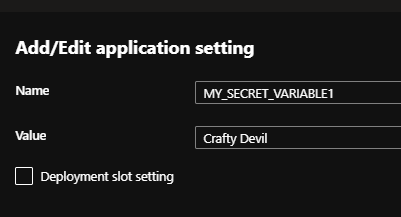
This shows that the environment variables currently have no values as they are both “None”. To add the environment variables go to the Configuration pane in your Azure WebApp and add two new application settings named the same as your local environment variables.
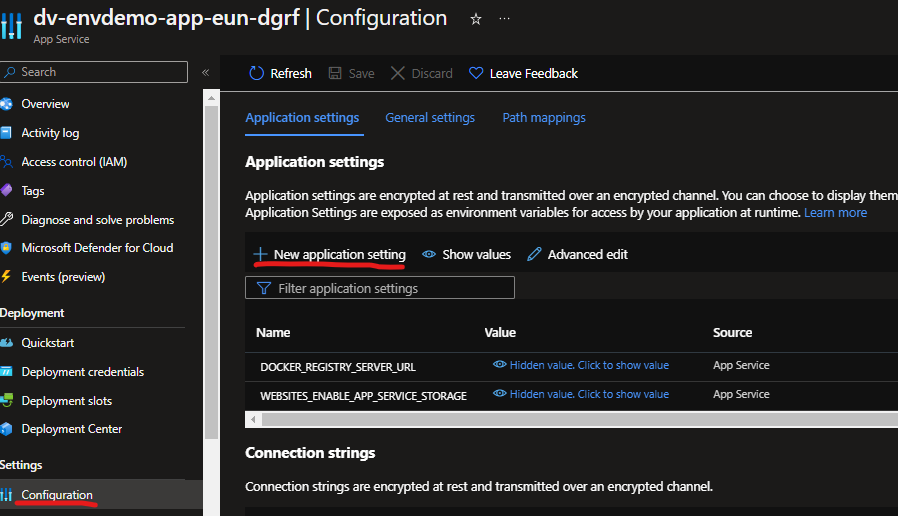
Give them any value and remember to save when completed…
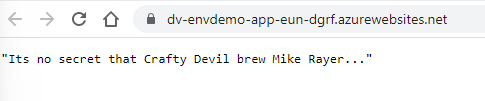
This will restart your app and when completed, if you refresh your WebApp URL you should see the None values replaced with the variables you added. Hooray! We can now add environment variables. This will be useful for deployments into different environments and for different connection properties.
Add Key Vault Secrets to Azure Webapp Variables
Now we want to make sure we can get these values from key vault as well so we can keep these values extra secure. First create yourself a key vault using the following Azure CLI command in the Azure portal or from VS code. You should already be logged in from earlier.
az keyvault create --name dv-envdemo-kv-eun-{uniquenamespace} --resource-group dv-envdemo-rg --location "NorthEurope"
Now add to secrets to this key vault, just make it a different beer to what you had before so you know that they are coming from key vault. Note that I had to use hyphens instead of underscore in the secret names as key vault demands this.
az keyvault secret set --vault-name dv-envdemo-kv-eun-{uniquenamespace} --name MY-SECRET-VARIABLE1 --value Wychwood
az keyvault secret set --vault-name dv-envdemo-kv-eun-{uniquenamespace} --name MY-SECRET-VARIABLE2 --value Hobgoblin
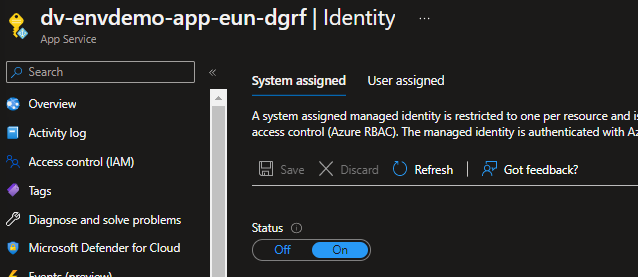
To ensure that your WebApp can access this key vault and Get the secrets, you first need to enable a system assigned identity on the app. This gives it an object in Active Directory that we can then grant appropriate access to on the key vault to read the secrets.
az webapp identity assign -g dv-envdemo-rg -n dv-envdemo-app-eun-{uniquenamespace}
You should see this reflected in the identity pane of your Azure WebApp where system assigned identity status will now be “On”.
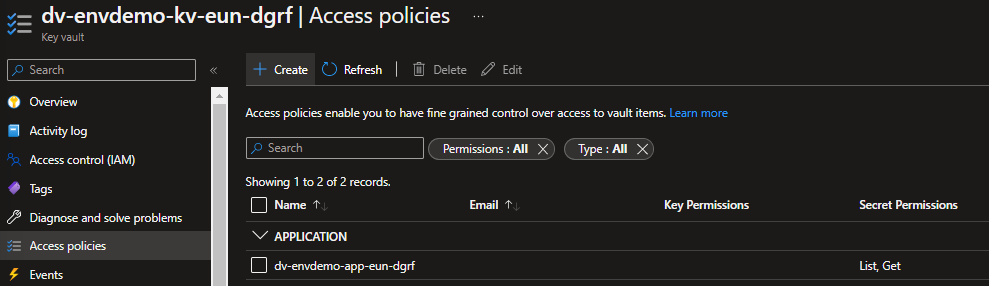
Copy the object ID on this pane as we will need in the following script. We now need to give the WebApp access to Get and List the secrets we have created. Do this by running the following (replacing with the appropriate object id you copied from above):
az keyvault set-policy -n dv-envdemo-kv-eun-{uniquenamespace} --secret-permissions get list --object-id {ObjectID}
If you now go to access policies on your key vault you should see the WebApp managed identity now has Get and List permissions on secrets.
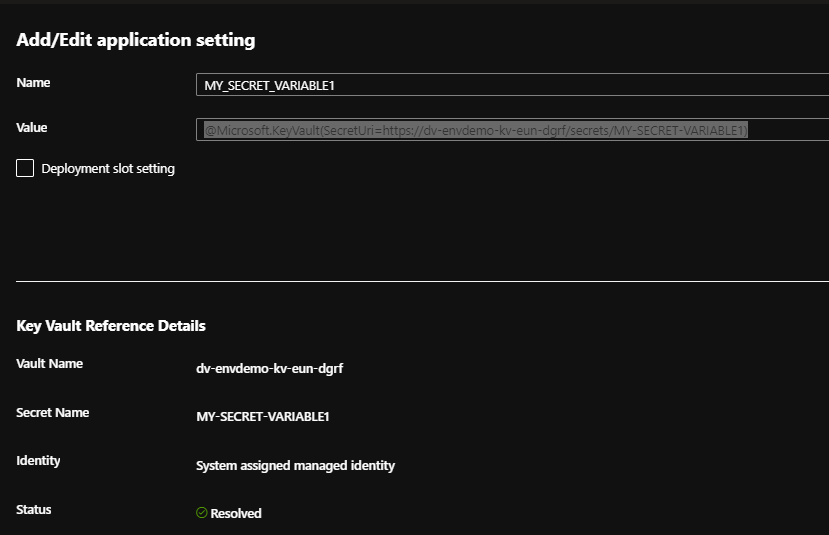
Now go to your Azure WebApp app configuration again, and update the secret variables to reference key vault instead by using the following syntax:
@Microsoft.KeyVault(SecretUri=https://dv-envdemo-kv-eun-{uniquenamespace}/secrets/MY-SECRET-VARIABLE1)
Keep an eye out for any issues with permissions and the managed identity, otherwise you should just end up with a green tick as below.
Now finally if you go to your WebApp URL you will see the new values from key vault present.

Hooray environment variables all round!